TutorMate User Guide
About
TutorMate is a desktop app targeted to private tuition teachers on handling tuition related matters.
It is optimized for use via a Command Line Interface (CLI 1) while still having the benefits of a Graphical User Interface (GUI 2). If you can type fast, TutorMate can get your administrative tasks done faster than traditional GUI 2 apps.
This document describes the main features of TutorMate:
- Student Management System: track all student details
- Lesson Schedule: easily plan and manage lessons
- Task Lists: keep track of tasks to be done for lessons
With a customised student list and schedule in TutorMate just for you, organising lessons and managing students will be the least of your worries.
Users are expected to have a basic level of technical knowledge and are familiar with fundamental computer operations and tasks e.g. how to open command terminal and install application.
This project is based on the AddressBook-Level3 project.
Table of Contents
Quick Start
Ensure you have Java 3 11 or above installed in your Computer. You can check by opening a command terminal 4 and typing
java -version.Download the latest
tutormate.jarfrom here.Copy the file to the folder you want to use as the home folder 5 for your TutorMate.
Open a command terminal 4, navigate into the home folder 5 using the change directory command
cd, and use thejava -jar tutormate.jarcommand to run the application.
A GUI 2 similar to the picture below should appear in a few seconds. Note how the app contains some sample data.
Type the command in the command box and press Enter to execute it. e.g. typing
helpand pressing Enter will open the help window.
Some example commands you can try:list students: Lists all students with their name.In 👨🎓 STUDENTS list:
add -name Leah: Adds a student named "Leah" to the application.show 3: Shows the details of the person with the index 3 in TutorMate.
exit: Exits the app.
Refer to the Features below for details of each command.
Refer to the Command Summary below for the summary of all commands.
Refer to the Glossary below for definitions of glossary terms.
Important Notes
Basic Usage
- The app is split into 3 states: 👨🎓 STUDENTS list, 📅 SCHEDULE list (default) and 💼 TASKS list. Each corresponds to the main features of TutorMate.
- Each state has its associated features, while certain features work with all states but has differing functionalities.
- The 👨🎓 STUDENTS list handles student details management, 📅 SCHEDULE list handles lessons, scheduling and the tasks for each lesson while the full 💼 TASKS list is a view to display all tasks.
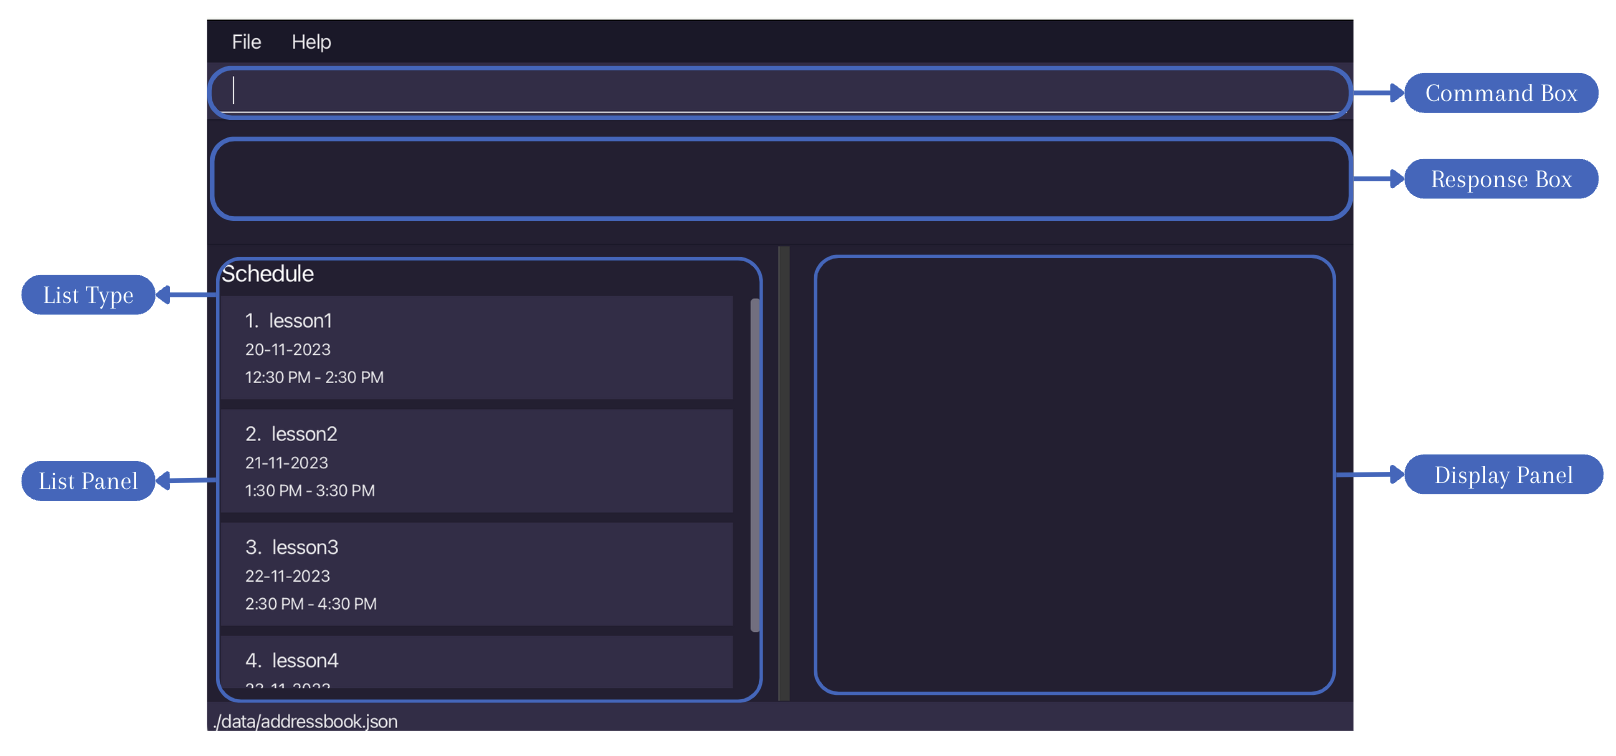
- The GUI 2 has several main components (see GUI 2 image below):
- The command box is for users to enter and execute commands.
- The response box is to display responses for command execution, to indicate success or errors.
- The left side has the list panel, which shows different list types (student, schedule, tasks).
- The right side has the details panel, which shows details of any specific item in the list.
Terminologies / Symbols
Flag: A flag is a word starting with a dash "-" that is used to identify the type of information that is being provided e.g.
-name.Text formatted as code snippets are either commands e.g.
list schedule, command formats e.g.list [LIST][KEYWORDS]or parameters e.g.NAME.- This box denotes additional information.
- This box denotes tips to improve usability.
- This box denotes warnings that can cause errors.
This box denotes command outputs.
Notes on Command Format
- Words in upper case are compulsory parameters to be supplied by the user.
e.g. inadd -name NAME,NAMEis a parameter which can be used asadd -name Leah. In this case, "Leah" is substituted forNAME. - Words in square brackets are optional.
e.g.list [LIST] [KEYWORDS]can be used aslistor aslist students email, though the behaviour may differ. - Flags can be in any order.
e.g. bothlink -student student name -lesson lesson nameandlink -lesson lesson name -student student nameare acceptable. - Parameters without a flag need to strictly follow the order specified.
e.g. For delete command which specifiesdelete INDEX, the "index" parameter must immediately follow the command name "delete". - All command names are case-insensitive.
e.g.linkTois the same aslinktoorLiNkTo. - When applicable, extraneous parameters and flags for commands will be ignored .
e.g. if the command entered isadd info -name new name -notValid flagBody -subject physics, it will be interpreted asadd -name new name -subject physics. "info " and "-notValid flagBody" will be ignored.
e.g. if the command entered isdelete 3 extra, it will be interpreted asdelete 3
e.g. However,delete extra 3will not be accepted as delete command specifies that the index parameter must immediately follow the command name.
Other Notes
- Please avoid using " -" in the value of a parameter as TutorMate treats " -" as a reserved word that signifies the start of a new flag.
- Please do not abuse the parser of TutorMate. For example, do not game it with special characters, patterns or code injections6. TutorMate does not guarantee the behaviour of the application on deliberate and malicious abuse beyond supported normal usage.
- TutorMate supports a maximum of 99999 students, 99999 lessons and 99999 tasks. Further data beyond this limit might be lost and not accessible in the application.
- Please avoid manually modifying the data files in the home folder5. Doing so may result in unexpected behaviour and data loss.
- Please avoid running multiple instances of TutorMate at the same time. Doing so may result in unexpected behaviour and data loss.
- If you are using a PDF version of this document, be careful when copying and pasting commands that span multiple lines as space characters surrounding line-breaks may be omitted when copied over to the application.
- If you are using a PDF version of this document, please note that the scroll panels for the code outputs in the examples will not work. They are just a reference for the outputs that you will see on the application. The errors and solutions will be elaborated in the examples.
Parameter Summary
| Parameter | Used in | Constraints | Valid examples | Invalid examples |
|---|---|---|---|---|
INDEX | showeditPerson deletePersoneditLesson deleteLessonaddTask deleteTask | Must be a positive integer in the range of 1 to 99999 inclusive. | "1", "24", "12" | "-1", "2147483648", "10000" |
LIST | list | Must be either "Students", "Schedule", "Tasks". Parameter is case-insensitive. | "STUDENTS", "stuDEnts" | "task", "student" |
KEYWORDS | list | Must be either "phone", "email", "address", "tags", "subjects", "remark", "none", or "all" | "none", "all", "subJeCts" | "subject", "" |
NAME, LESSON_NAME, STUDENT_NAME | addLesson editLessonaddPerson editPersonfilter findlinkTo | Must not be empty. Must only contain alphanumeric characters. | "John", "Elton" | "", "jo!" |
SUBJECT | addLesson editLesson | Must be either "Mathematics", "Physics", "Biology", "Chemistry" or "English". | "mathematics", "MATHEMATICS", | "math" |
SUBJECTS | addPerson editPersonfilter | Must be a valid SUBJECT (see row above) or multiple entries of SUBJECT separated using a comma (,). | "mathematics", "mathematics, physics" | "math, physics" |
PHONE | addPerson editPerson | Should be at least 3 characters long, and can only contain numbers. | "96681234", "823234" | "+6592212341", "98" |
EMAIL | addPerson editPerson | Should follow the format localpart@domain. The local-part should only contain alphanumeric characters and these special characters, excluding the parentheses, (+_.-). The local-part may not start or end with any special characters. This is followed by a '@' and then a domain name. The domain name is made up of domain labels separated by periods. The domain name must: - end with a domain label at least 2 characters long - have each domain label start and end with alphanumeric characters - have each domain label consist of alphanumeric characters, separated only by hyphens, if any. | "hello@gmail.com", "test@g.com" | "hello.com", "f@f" |
ADDRESS | addPerson editPerson | Must not be empty. | "Bedok", "25 Lower Kent Ridge Road" | "" |
REMARK | addPerson editPerson | Must be either alphanumeric or a symbol (!, @, #...). Can be empty | "Bedok", "25 Lower Kent Ridge Road", "", "@" | "💼", "爱" |
TAG | addPerson editPersonfilter | Must not be empty and cannot contain any spaces. Multiple tags can be specified at once by using a comma (,) as a separator. | "jc,express", "weak" | "junior college" |
DATE | addLesson editLessonfilter | Must follow either the date format yyyy/MM/dd, yy/MM/dd, MM/dd, dd. See here for an exhaustive explanation of the allowable formats. | To represent the date 13/08/2023 and assuming today is 07/08/2023: "2023/08/13", "23/08/13", "08/13", "13" | "20222/08/2", "13/1" |
TIME | addLesson editLessonfilter | Must follow either HH:MM or H:MM (only for 0:00 to 9:59) | "13:30", "9:17" | "9:1", "13:70" |
SEARCH_STRING | find | Must not be empty. | "Alex", "alex yeoh", "+asdf-" | "" |
DESCRIPTION | addTask | Must not be empty. | "Mark Alkanes Extra Practice", "Make Forces Notes" | "" |
Features
List Feature
The list command is the way to navigate between the 3 states in our app. It will display the specified list and its corresponding details panel.
Format: list [LIST] [KEYWORDS]
- Shows the list and associated detail panel for the specified
[LIST]. - The
[KEYWORDS]parameter is for specifying which student details to display, and is only valid for 👨🎓 STUDENTS list. Specifying the[KEYWORDS]parameter without specifying the[LIST]parameter is not allowed. When used for displaying the 📅 SCHEDULE list and 💼 TASKS list,[KEYWORDS]will be ignored. - Refer to the parameter constraints here.
Tips:
listwithout specifying the[LIST]parameter defaults to showing the 📅 SCHEDULE list.- Using the
[KEYWORDS]parameter afterlist(without specifying[LIST]) is not allowed!
For Student:
Example usages:
list studentsdisplays all the students with their names (including previously specified fields).list students subjects emaildisplays all the students with their names, the list of subjects for each student and their email.
Success outputs:
- Input:
list students(with no additional student details):
Showing list STUDENT

For Schedule:
Example usages:
listandlist scheduledisplays the 📅 SCHEDULE list with all the lessons with their names in time order.
Success outputs:
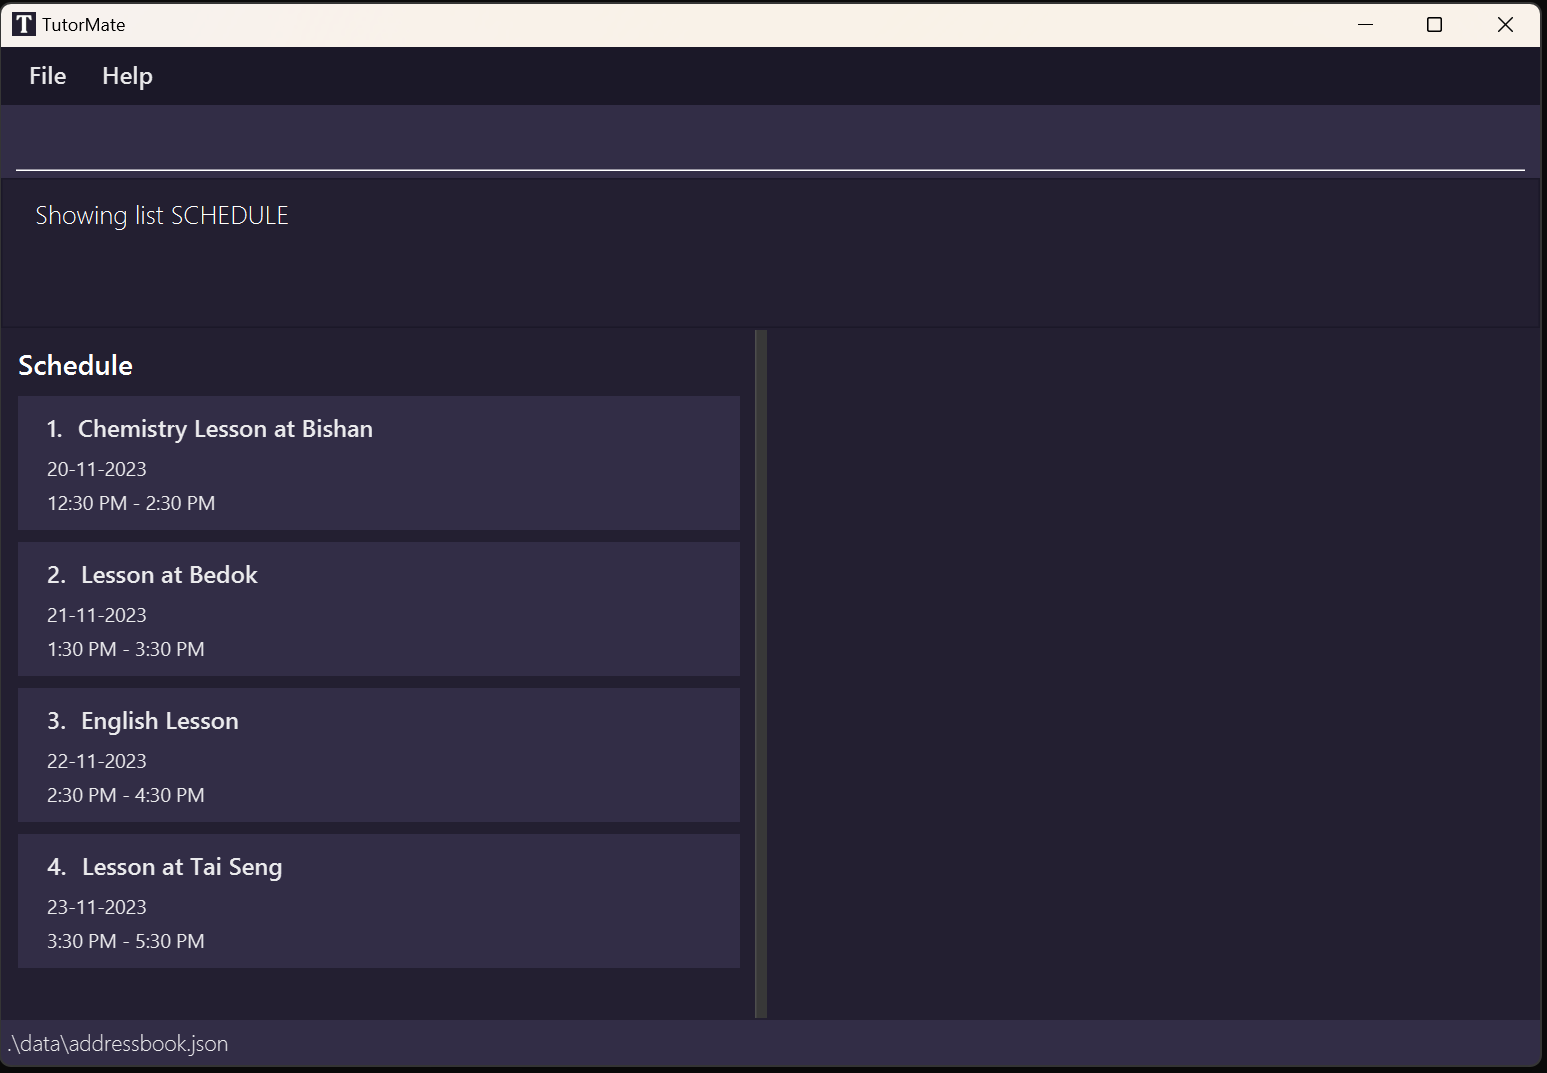
- Input:
listorlist schedule
Showing list SCHEDULE
Note: list schedule subjects will display the 📅 SCHEDULE list with all the lessons with their names in time order. subjects will be ignored.
For Task:
Example usages:
list tasksdisplays all the tasks with their description.
Success outputs:
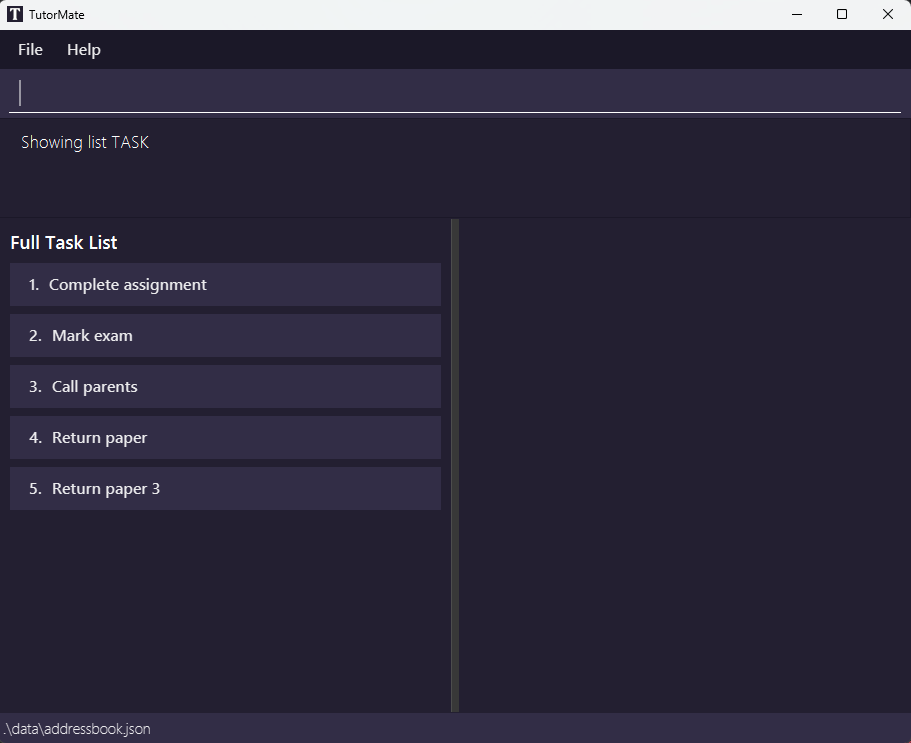
- Input:
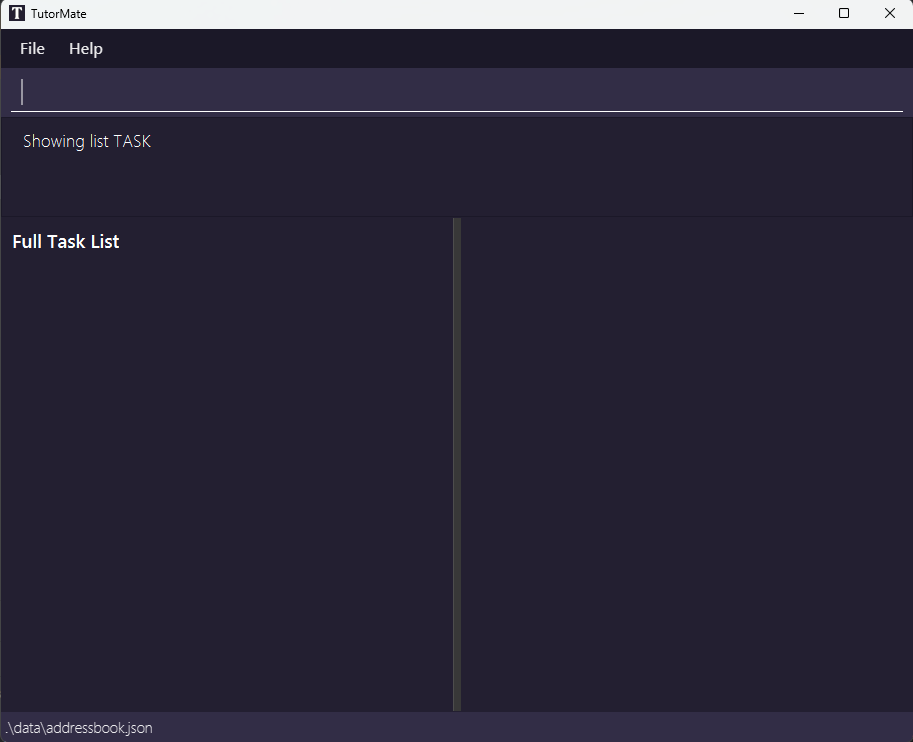
list tasks
Showing list TASK
- If there are no entries, e.g. there are no students added yet or there are no tasks added yet, an empty list is displayed.
General Examples
Failure outputs:
- Input:
list student- Error: Should spell
studentsinstead ofstudent.
- Error: Should spell
- Input:
list task- Error: Should spell
tasksinstead oftask.
- Error: Should spell
- Input:
list students EMAIL- Error: Should spell
emailin lower case, notEMAIL.
- Error: Should spell
- Input:
list students subject- Error: Should spell
subjectsinstead ofsubject.
- Error: Should spell
- Input:
list students subjects,phone- Error: Use space separation
subjects phonefor keywords instead of comma separation.
- Error: Use space separation
  list: Displays the specified list, which can be a STUDENTS list, SCHEDULE list or TASKS list. Default command without specified list displays the schedule list. When specifying STUDENTS list, optional parameters can be used to specify what student details to display.
  Parameters: [LIST] [KEYWORDS]...
  Example: list schedule
  Example: list students phone email
  Example: list tasks
Show Feature
The show command has different behaviours depending on the current list. It shows the details of the specified item in the current list in the application.
Format: show INDEX
- The command format is the same for all lists.
- Shows the details of the lesson/task/student at the specified
INDEX. - The
INDEXrefers to the index number shown in the displayed list. - The
INDEXhas to be within the range of the displayed 👨🎓 STUDENTS list, 📅 SCHEDULE list or 💼 TASKS list. - Refer to the parameter constraints here.
For Student:
In 👨🎓 STUDENTS list, the show command shows the details of the specified student from the 👨🎓 STUDENTS list in the application.
Example usages:
list STUDENTSfollowed byshow 2shows the details of the 2nd student in the 👨🎓 STUDENTS list.find Betsyfollowed byshow 1shows the details of the 1st student in the results of thefindcommand.
Success outputs:
- Input:
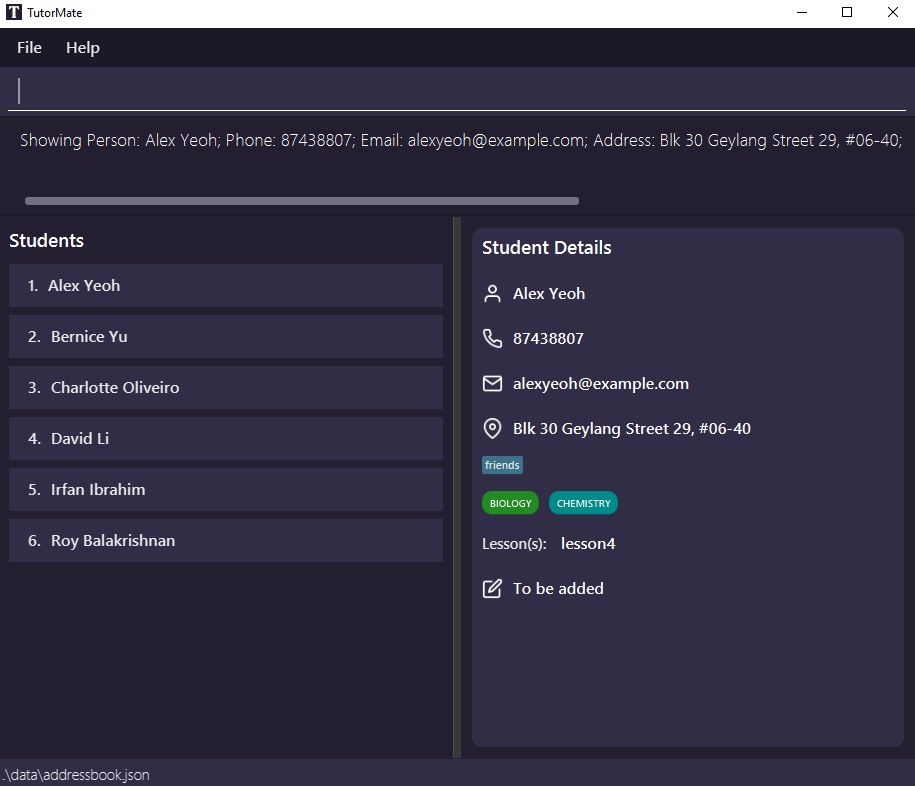
show 1
Showing Person: Alex Yeoh; Phone: 87438807; Email: alexyeoh@example.com; Address: Blk 30 Geylang Street 29, #06-40; Subjects: BIOLOGYCHEMISTRY; Tags: [friends]; Remark: To be added
For Schedule:
In 📅 SCHEDULE list, the show command shows the details of the specified lesson from the 📅 SCHEDULE list in the application.
Example usages:
list SCHEDULEfollowed byshow 2shows the details of the 2nd lesson in the 📅 SCHEDULE list.find lesson1followed byshow 1shows the details of the 1st lesson in the results of thefindcommand.
Success outputs:
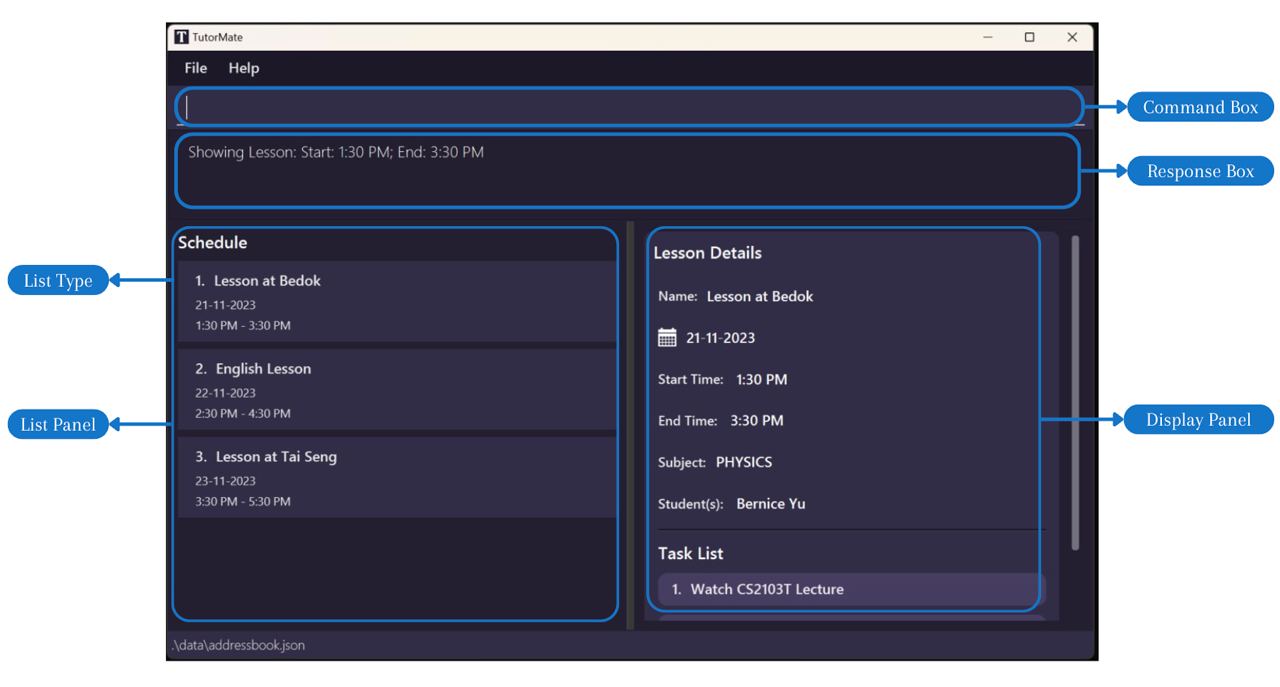
- Input:
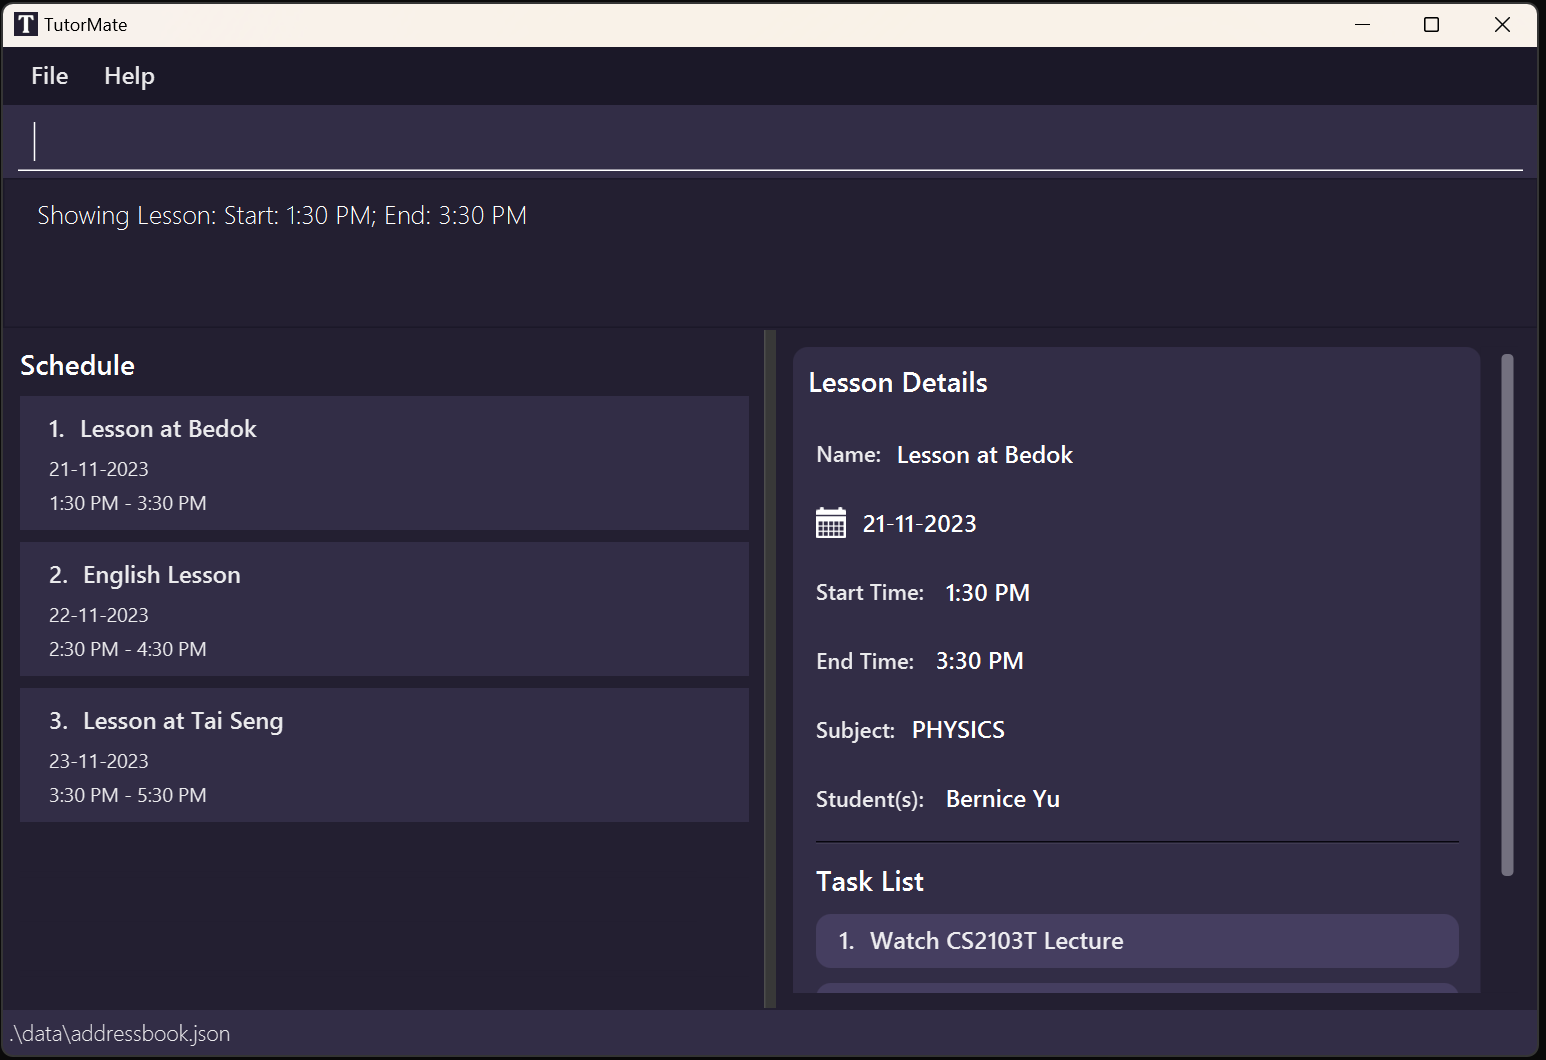
show 1
Showing Lesson: Start: 1:30 PM; End: 3:30 PM
For Task:
In 💼 TASKS list, the show command shows the details of the specified task from the full 💼 TASKS list in the application.
Example usages:
list TASKSfollowed byshow 2shows the description of the 2nd task in the full 💼 TASKS list.
Success outputs:
- Input:
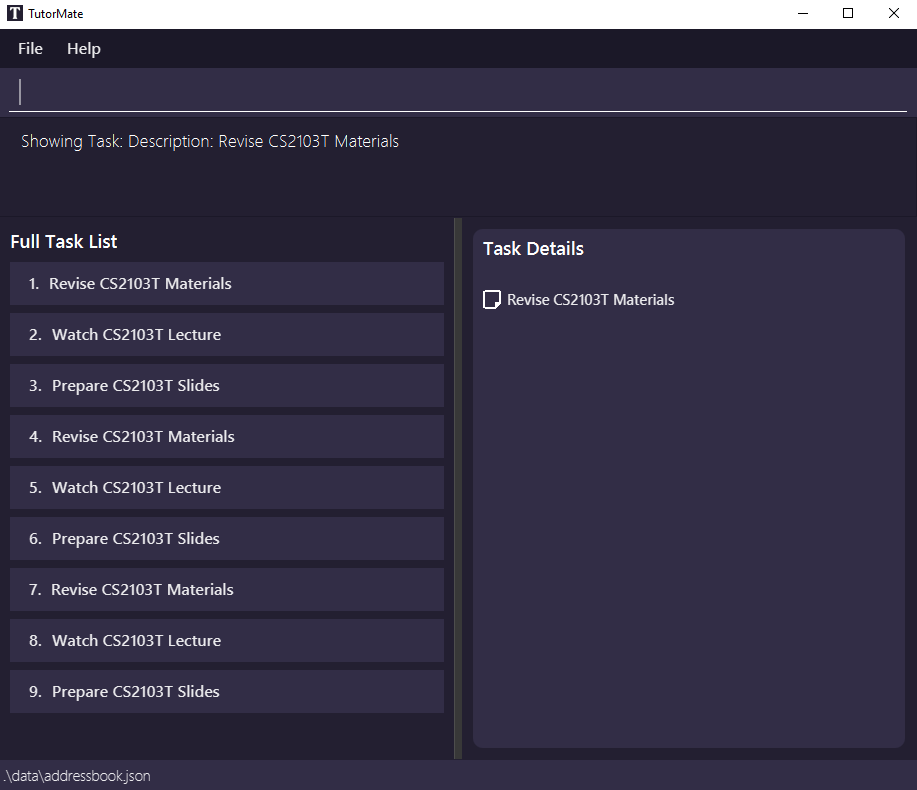
show 1
Showing Task: Description: Revise CS2103T Materials
General Examples
Failure outputs:
- Input:
show- Error: No index given. Enter a valid index!
  Invalid command format!
  show: Shows the details of the item identified by the index number used in the last item listing.
  Parameters: INDEX (must be a positive integer)
  Example: show 1
- Input:
show 100- Error: Index given exceeds the length of the displayed list. Enter a valid index!
The lesson index provided is invalid
Add Feature
Adds a student/lesson/task to the 👨🎓 STUDENTS list, 📅 SCHEDULE list or the 💼 TASKS list of a lesson in the application.
For Student:
Format: addPerson -name NAME [-phone PHONE_NUMBER] [-email EMAIL] [-address ADDRESS] [-subject SUBJECTS] [-tag TAG] [-remark REMARK]
- A new student cannot have the same name (case-insensitive) as existing students in the 👨🎓 STUDENTS list.
- A student can have any number of unique tags (including 0)
- Duplicate phone numbers are allowed, since it is possible for 2 children to use their parent's number.
- Refer to the parameter constraints here.
Tips:
- If the user is currently in 👨🎓 STUDENTS list, the command can be shortened to
add.
Example usages:
addPerson -name JohnaddPerson -name John -phone 91234567 -email test@gmail.com -address 10 Kent Ridge Drive -subject MATHEMATICS- In 👨🎓 STUDENTS list :
add -name John -phone 91234567 -email test@gmail.com -address 10 Kent Ridge Drive -subject MATHEMATICS
Success outputs:
- Input:
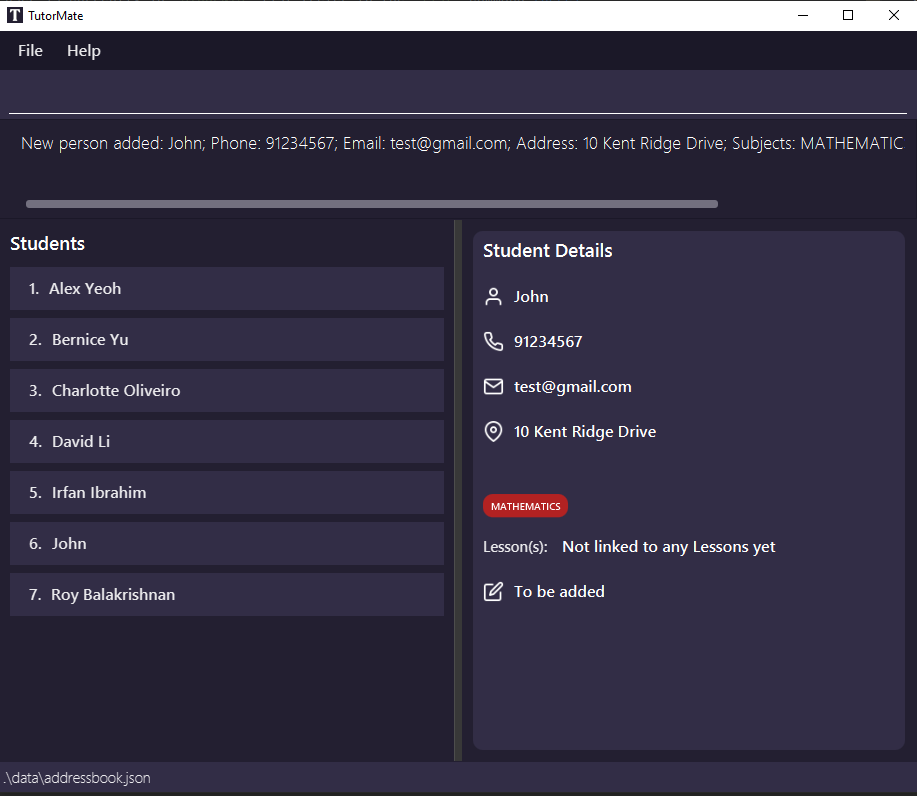
addPerson -name John -phone 91234567 -email test@gmail.com -address 10 Kent Ridge Drive -subject MATHEMATICS
New person added: John; Phone: 91234567; Email: test@gmail.com; Address: 10 Kent Ridge Drive; Subjects: MATHEMATICS; Tags: ; Remark: To be added
Failure outputs:
- Input:
addPerson- Error: No name given. Enter the -name flag with a valid name.
Invalid person format: Flag name not found.
Usage: addPerson -name NAME (any number of unique [-phone|email|address|subject|tag|remark] VALUE).
For example, addPerson -name John -phone 91234567
If you are currently displaying student list, you could use 'add' inplace of 'addPerson'.
Note you must provide a 'name' not already in the address book.
For Schedule:
Format: addLesson -name NAME [-day DATE] [-start TIME] [-end TIME] [-subject SUBJECT]
- A new lesson cannot have the same name as existing students in the contact list.
- Start time cannot be after end time.
- Users can choose to specify the start or end time of a lesson only.
- Refer to the parameter constraints here.
Tips:
If the user is currently in 📅 SCHEDULE list, the command can be shortened to add.
Example usages:
addLesson -name Chemistry Lesson at BishanaddLesson -name Lesson at Tai Seng -start 09:00 -end 11:00 -day 03/21 -subject physics- In 📅 SCHEDULE list :
add -name Lesson at Yishun -day 21 -subject MATHEMATICS
Success outputs:
- Input:
addLesson -name Chemistry Lesson at Bishan
New lesson added: Lesson Chemistry Lesson at Bishan
- Input:
addLesson -name Lesson at Tai Seng -start 09:00 -end 11:00 -day 03/21 -subject physics
New lesson added: Lesson Lesson at Tai Seng from 9:00 AM to 11:00 AM on 21-03-2023 for PHYSICS
Failure outputs:
- Input:
addLesson -name Chemistry Lessonfollowed byaddLesson -name Chemistry Lesson -day 2023/12/12- Error: A new lesson cannot have the same name as an existing lesson. Enter another name for the new lesson.
Lesson with this name already exists in the schedule
- Input:
addLesson -name English Lesson -start 13:00 -end 10:00- Error: The start time specified for a lesson cannot be after its end time. Enter a start time that is before the end time.
Invalid lesson input: End time: 10:00 AM cannot be before start time: 1:00 PM..
Usage: addLesson -name NAME (any number of unique [-subject|day|start|end VALUE]).
 For example, addLesson -name John -subject English -day 23 -start 14:30 -end 16:30
 If you are currently displaying schedule list, you could use 'add' inplace of 'addLesson'.
 Note you must provide a 'name' not already in the schedule and 'start' must be before 'end'.
For Task:
Format: addTask [INDEX] DESCRIPTION
- Adds the task to the lesson at specified
INDEXof the displayed 📅 SCHEDULE list or to the shown lesson (ifINDEXis omitted). - The
INDEXhas to be within the range of the displayed 📅 SCHEDULE list. - A new task cannot have the same description as existing tasks in the task list of that specific lesson.
- Refer to the parameter constraints here.
Example usages:
addTask 1 Make Forces Notes- With a lesson shown:
addTask Mark MYE Practice Paper
Success outputs:
- Input:
addTask 1 Make Forces Notes
New task added to lesson with index 1: Make Forces Notes
- Input:
addTask Mark MYE Practice Paper
New task added to current lesson: Mark MYE Practice Paper
Failure outputs:
- Input:
addTask- Error: No lesson index specified and no lesson shown. Missing description.
Use theshowcommand or add the lesson index you want to add tasks to afteraddTask. Add description of the task at the end of the command.
- Error: No lesson index specified and no lesson shown. Missing description.
Invalid description: Tasks can take any values, and it should not be blank
Usage: addTask + [lesson index] [description]. You could omit the lesson index when adding task to showing lesson.
Example1: addtask 1 do homework
Delete Feature
Deletes the specified item in the 👨🎓 STUDENTS list or 📅 SCHEDULE list of the application.
For Student:
Deletes a student in the 👨🎓 STUDENTS list of the application.
Format: deletePerson INDEX
- Deletes the student at the specified
INDEX. - The
INDEXrefers to the index number shown in the displayed 👨🎓 STUDENTS list. - The
INDEXhas to be within the range of the displayed 👨🎓 STUDENTS list. - The command is case-insensitive: e.g.
deleteperson,deletePersonandDELETEPERSONare all valid. - Refer to the parameter constraints here.
Tips:
- If the user is currently in the 👨🎓 STUDENTS list, the command can be shortened to
delete.
Example usages:
deletePerson 1- In 👨🎓 STUDENTS list :
delete 1
Success outputs:
- Input:
deletePerson 1
Deleted Person: Alex Yeoh; Phone: 87438807; Email: alexyeoh@example.com; Address: Blk 30 Geylang Street 29, #06-40; Subjects: BIOLOGYCHEMISTRY; Tags: [friends]; Remark: To be added
Failure outputs:
- Input:
deletePerson- Error: No index given. Enter a valid index!
Invalid command format!
deleteperson: Deletes the entry identified by the index number used in the displayed list.
Parameters: INDEX (must be a positive integer)
Example: delete 1
For Schedule:
Deletes a lesson in the 📅 SCHEDULE list of the application.
Format: deleteLesson INDEX
- Deletes the lesson at the specified
INDEX. - The
INDEXrefers to the index number shown in the displayed 📅 SCHEDULE list. - The
INDEXhas to be within the range of the displayed 📅 SCHEDULE list. - The command is case-insensitive: e.g.
deletelesson,deleteLessonandDELETELESSONare all valid. - Refer to the parameter constraints here.
Tips:
- If the user is currently in the 📅 SCHEDULE list, the command can be shortened to
delete.
Example usages:
deleteLesson 1- In 📅 SCHEDULE list :
delete 1
Success outputs:
- Input:
deleteLesson 1
Deleted Lesson: Lesson lesson1 from 12:30 PM to 2:30 PM on 20-11-2023 for MATHEMATICS
Failure outputs:
- Input:
deleteLesson- Error: No index given. Enter a valid index!
Invalid command format!
deletelesson: Deletes the lesson identified by the index number used in the displayed schedule list.
Parameters: INDEX (must be a positive integer)
Example: deletelesson 1
For Task:
Deletes the specified task from the shown lesson in the application. User must be in the 📅 SCHEDULE list and showing a lesson.
Format: deleteTask INDEX
- Deletes the task at the specified
INDEXof the task list in the shown lesson. - The
INDEXrefers to the index number shown in the displayed task list of the lesson. - The
INDEXhas to be within the range of the displayed task list. - The command is case-insensitive: e.g.
deletetask,deleteTaskandDELETETASKare all valid. - Refer to the parameter constraints here.
Caution:
The deleteTask command can only be used in the 📅 SCHEDULE list and while a lesson is shown.
Example usages:
- In 📅 SCHEDULE list :
show 1followed bydeleteTask 2deletes the 2nd task of the 1st lesson in the 📅 SCHEDULE list.
Success outputs:
- Input:
show 1followed bydeleteTask 1
Deleted Task: Revise CS2103T Materials
Failure outputs:
- Input:
show 1followed bydeleteTask 100- Error: The index given is invalid. Enter a valid task index!
Task index do not belong to any tasks!
- Input:
show 1followed bydeleteTask- Error: No index given. Enter a valid task index!
Invalid command format!
deletetask: Deletes the task identified by the task index from the currently displayed lesson.
Parameters: task index (must be a positive integer)
Example: deletetask 1
- Input:
deleteTask 1without showing a lesson- Error: No lesson shown. Show a lesson with the
showcommand.
- Error: No lesson shown. Show a lesson with the
Please use show lessonIndex before deleting task!
Edit Feature
Edits the specified item in the 👨🎓 STUDENTS list or 📅 SCHEDULE list of the application.
For Student:
Format: editPerson [INDEX] [-name NAME] [-phone PHONE_NUMBER] [-email EMAIL] [-address ADDRESS] [-subject SUBJECTS] [-tag TAG] [-remark REMARK]
- Edits the student at the specified
INDEXif it is provided, otherwise edits the currently/lastly shown student. - The
INDEXhas to be within the range of the displayed 👨🎓 STUDENTS list. - The name of the student after editing cannot be the same (case-insensitive) as other existing students in the contact list.
- You must specify at least one field to edit.
- Refer to the parameter constraints here.
Tips:
- If you are currently in 👨🎓 STUDENTS list, the command can be shortened to
edit.
Example usages:
editPerson 1 -name John- To edit the currently shown student in 👨🎓 STUDENTS list:
edit -phone 91234567 -tag jc,express
Success outputs:
- Input:
editPerson 1 -name new name -phone 91234567 -tag jc,express
Edit success.
 from: Bernice Yu; Phone: 99272758; Email: berniceyu@example.com; Address: Blk 30 Lorong 3 Serangoon Gardens, #07-18; Subjects: MATHEMATICSENGLISH; Tags: [colleagues][friends]; Remark: sn
 to: new name; Phone: 91234567; Email: berniceyu@example.com; Address: Blk 30 Lorong 3 Serangoon Gardens, #07-18; Subjects: MATHEMATICSENGLISH; Tags: [jc][express]; Remark: sn
Failure outputs:
- Input:
editPerson 1- Error: No field to edit given. Need to enter at least one field to edit.
No edit detected. Please edit at least one field: name, phone, email, address, subjects, remark, tags to different value.
- Input:
editPerson 1 -name David Li(assuming there is already another student named David Li)- Error: The name of the student after editing cannot be the same as other existing students in the contact list.
Clash detected.
Edited: David Li; Phone: 91234567; Email: berniceyu@example.com; Address: Blk 30 Lorong 3 Serangoon Gardens, #07-18; Subjects: MATHEMATICSENGLISH; Tags: [jc][express]; Remark: sn
Clashes with: David Li; Phone: 91031282; Email: lidavid@example.com; Address: Blk 436 Serangoon Gardens Street 26, #16-43; Subjects: BIOLOGY; Tags: [family]; Remark: .
- Input:
editPerson -phone 91234567 -tag jc,express(assuming no student is currently shown)- Error: If
editPersonis used without specifyingINDEX, then a student must be selected via theshow INDEXcommand.
- Error: If
Using edit command without specifying index when no entry is shown.
Usage: edit [INDEX] (at least one of unique [-name|phone|email|address|subject|tag|remark VALUE]).
For example, edit 1 -name John -phone 91234567
If you want to edit the currently shown person, you could omit the index.
Note your edited 'name' must not already in the address book.
For Schedule:
Format: editLesson [INDEX] [-name NAME] [-start TIME] [-end TIME] [-day DATE] [-subject SUBJECT] (for list specific format)
- Edits the lesson at the specified
INDEXif it is provided, otherwise edits the currently/lastly shown lesson. - The
INDEXhas to be within the range of the displayed 📅 SCHEDULE list. - You must specify at least one field to edit.
- The name of the lesson after editing cannot be the same (case-insensitive) as other existing lessons in the schedule list.
- The start time of the lesson after editing cannot be after the end time of the lesson, if the end time is specified, and vice versa.
- The lesson cannot clash (same day, start and end all specified and are overlapping) in time with other lessons in the schedule list.
- Please note that unlike the
addLessoncommand, theeditLessoncommand's "-subject" flag only accepts one subject, not multiple subjects (parameter isSUBJECT, notSUBJECTS). - Refer to the parameter constraints here.
Tips:
- If you are currently in 📅 SCHEDULE list, the command can be shortened to
edit.
Example usages:
editLesson 1 -start 12:35 -end 14:35 -day 2023/11/21 -subject English- To edit the currently shown lesson in 📅 SCHEDULE list:
edit -start 12:30 -end 14:30 -day 2023/11/20 -subject English
Success outputs:
- Input:
editLesson 1 -start 12:35 -end 14:35 -subject English
Edit success.
from: Lesson lesson1 from 12:30 PM to 2:30 PM on 20-11-2023 for MATHEMATICS
to: Lesson lesson1 from 12:35 PM to 2:35 PM on 20-11-2023 for ENGLISH
Failure outputs:
- Input:
editLesson 1- Error: No field to edit given. Need to enter at least one field to edit.
No edit detected. Please edit at least one field: name, start, end, subject, day to different value.
- Input:
editLesson -name a new name(assuming no lesson is currently shown)- Error: No lesson shown. Show a lesson with the
showcommand.
- Error: No lesson shown. Show a lesson with the
Using edit command without specifying index when no entry is shown.
Usage: edit [INDEX] (at least one of unique [-name|subject|day|start|end VALUE]).
For example, edit 1 -name lesson2 -subject English -day 23/12 -start 14:30 -end 16:30
If you want to edit the currently shown lesson, you could omit the index.
Note your edited 'name' must not already in the schedule and 'start' must be before 'end'.
- Input:
editLesson 1 -start 12:35 -end 14:35 -day 2023/11/21(assuming there is already another lesson with clashing time)- Error: The lesson cannot clash (same day, start and end all specified and are overlapping) in time with other lessons in the schedule list.
Time clash detected.
Edited: Lesson lesson1 from 12:35 PM to 2:35 PM on 21-11-2023 for ENGLISH
Clashes with: Lesson lesson2 from 1:30 PM to 3:30 PM on 21-11-2023 for PHYSICS.
- Input:
editLesson 1 -name lesson2(assuming there is already another lesson named lesson2)- Error: The name of the lesson after editing cannot be the same as other existing lessons in the schedule list.
Name clash detected.
Edited: Lesson lesson2 from 12:30 PM to 2:30 PM on 20-11-2023 for MATHEMATICS
Clashes with: Lesson lesson2 from 1:30 PM to 3:30 PM on 21-11-2023 for PHYSICS.
For Task:
Editing of 💼 TASKS list is not supported at this time!
Find Feature
The find command finds students (in 👨🎓 STUDENTS list) or lessons (in 📅 SCHEDULE list) whose names contain the search string 7.
Format: find SEARCH_STRING
- The search is case-insensitive. e.g.
lessonwill matchLesson.hanswill matchHans. - Names does not need to match the search string 7, as long as they contain it they will be returned. e.g. search string 5
sson Chewill returnLesson Chemistry. - While non-alphanumeric characters are allowed in the search string 7, they will likely not return any results as
NAMEparameter only allows alphanumeric characters.
Caution:
- Finding tasks by name/description is disabled.
- Tasks can be found based on the lesson (find lesson by name) and
showlesson to see list of tasks of the lesson.
For Student:
Example usages:
find bernicefind a
Success outputs:
- Input:
find bernice
1 persons listed!
- Input:
find a[s*(|o
0 persons listed!
For Schedule:
Example usages:
find lessonfind b
Success outputs:
- Input:
find lesson
4 lessons listed!
- Input:
find &*af1
0 lessons listed!
For Task:
Finding in 💼 TASKS list is not supported at this time!
General Examples
Failure outputs:
- Input:
findorfind- Error: search string7 is empty.
Invalid command format!
find: Finds all persons or lesson whose names contains the specified search string (case-insensitive) and displays them as a list with index numbers.
Parameter: SEARCH_STRING
Example: find alex yeoh
- Input:
find task1(in 💼 TASKS list)- Error: Find command is disabled in task list.
Unknown command
Filter Feature
For Student:
You must be in the 👨🎓 STUDENTS list to run this command. Type list students to go to the 👨🎓 STUDENTS list.
filter [-name NAME] [-subject SUBJECTS] [-tag TAG] [-remark REMARK] - Multiple fields can be specified at the same time.
- Refer to the parameter constraints here.
- At least one optional field should be specified.
Tips:
- When filtering by multiple fields, only the students which match all the fields are returned.
- To reset the view to an unfiltered state, type
list students. - If no students that match the filters are found, an empty list will be shown.
Example usages:
filter -name Alex -tag primary -subject Mathematics
Success outputs:
- Input:
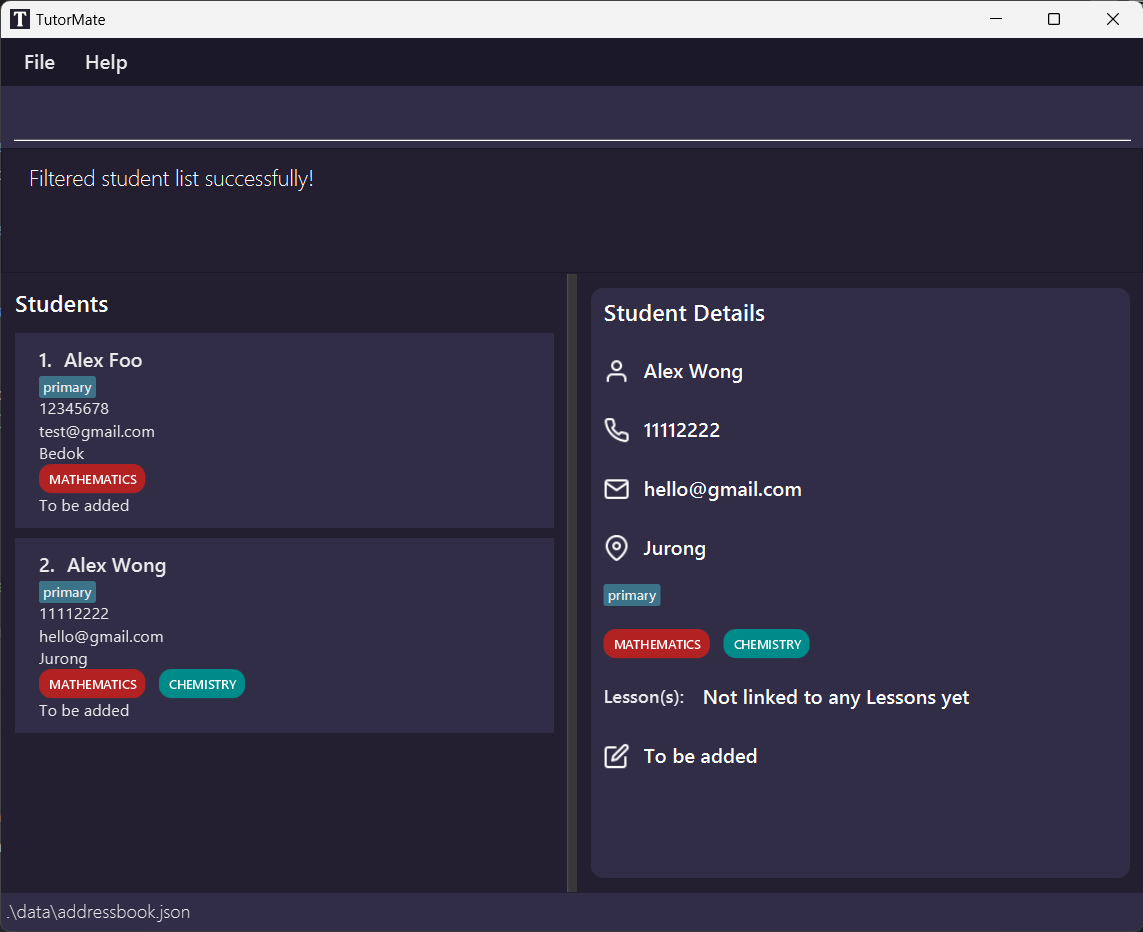
filter -name Alex -tag primary -subject Mathematics - Input:
filter -name Brian
Filtered student list successfully!
Failure outputs:
- Input:
filter -name Alan!- Error: The non-alphanumeric character "!" is used. To fix the error, remove all non-alphanumeric characters.
Invalid filter format: Names should only contain alphanumeric characters and spaces, and it should not be blank.
Usage: filter (any number of unique -[name|subject|tag|remark] [value]).
For example, filter -name John -subject physics,english
For Schedule:
You must be in the 📅 SCHEDULE list to run this command. Type list schedule to go to the 📅 SCHEDULE list.
filter [-name NAME] [-subject SUBJECTS] [-before DATE] [-on DATE] [-after DATE] - Only one of
-before,-on,-aftercan be used at once. For example, you cannot use both-beforeand-afterin the same filter command. - The dates specified in
-beforeand-afterare exclusive. For example, specifying-before 2023/05/01will find lessons before but not on 2023/05/01. - Refer to the parameter constraints here.
- At least one optional field should be specified.
Tips:
- When filtering by multiple fields, only the lessons which match all the fields are returned.
- To reset the view to an unfiltered state, type
list schedule. - If no lessons that match the filters are found, an empty list will be shown.
Example usages:
filter -before 2022/10/10 -subject Mathematicsfilter -name CS2103T Lab
Success outputs:
- Input:
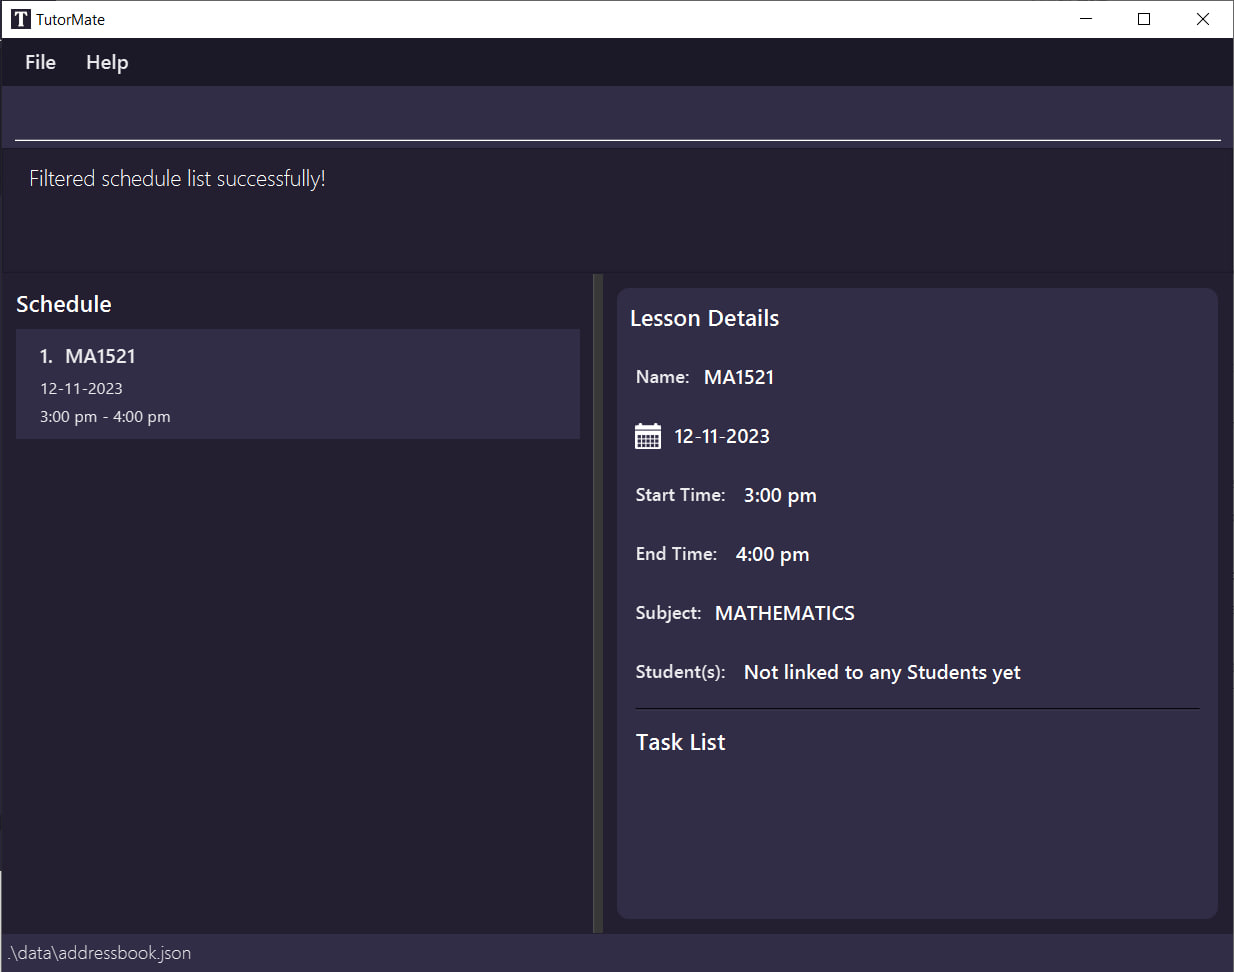
filter -before 2023/12/20 -subject Mathematics
Filtered schedule list successfully!
 Failure outputs:
- Input:
filter -before 2022/10/10 -after 2022/01/01- Error: Both the
-beforeand-afterflags are specified. Use only one of-before,-after, and-onin the same command.
- Error: Both the
Invalid filter format: You can only use one of -before, -on, -after at a time.
Usage: filter -(at least one of unique [-name|subject|before|on|after|remark VALUE]).
For example, filter -before 2023/10/10 -subject physics
Note you should only use one of -before, -on, -after at a time.
- Input:
filter -on 2/2/2- Error: The date given is invalid. Please specify a date using the correct format (see here)
Invalid filter format: 2/2/2 is not a valid date, please use yyyy/mm/dd or mm/dd or dd
for example, assume today is 2023/11/3, to add 2023/11/29, could use 29, 11/29, 2023/11/29 or 23/11/29.
Usage: filter -(at least one of unique [-name|subject|before|on|after VALUE]).
For example, filter -before 2023/10/10 -subject physics
Note you should only use one of -before, -on, -after at a time.
For Task:
Filtering is not supported in the 💼 TASKS list at this time!
General Examples
Failure outputs:
- Input:
filter- Error: No fields specified to filter.
Invalid filter format: You must specify at least one unique field to filter!.
Usage: filter -(at least one of unique [-name|subject|before|on|after VALUE]).
For example, filter -before 2023/10/10 -subject physics
Note you should only use one of -before, -on, -after at a time.
Link Feature
You can link lessons to students, and vice versa. For example, if a lesson has a few students, you can link each of the students to the lesson, so that you can quickly see who is attending this specific lesson.
For Both Student and Schedule:
You can be in the 👨🎓 STUDENTS list or 📅 SCHEDULE list.
Format: link -student STUDENT_NAME -lesson LESSON_NAME
STUDENT_NAMEis the name of the student you would like to link to.LESSON_NAMEis the name of the lesson you would like to link to.- Refer to
STUDENT_NAME's andLESSON_NAME's constraints here.
As of now, you cannot unlink a lesson from a student and vice versa. Use caution when running the link command.
Example usages:
link -student alex yeoh -lesson lesson1
Success output:
- Input:
link -student alex yeoh -lesson lesson1
Linked alex yeoh to lesson1
Failure outputs:
- Input:
link -student alex yeoh -lesson lesson1twice
The student is already linked to this lesson
- Input:
link -student alexxxx -lesson lesson1(No student with alexxxx in application)
No such student with name alexxxx found
Tips: LESSON_NAME is case-insensitive. This means that "CS2103T Lab" and "cs2103T lab" are treated as the same lesson.
For Student:
You must be in the 👨🎓 STUDENTS list and are viewing a student to run this command. Type list students to go to the 👨🎓 STUDENTS list, then type show INDEX to select a student to link lessons to.
Format: linkTo LESSON_NAME
LESSON_NAMEis the name of the lesson you would like to link to.- Refer to
LESSON_NAME's constraints here.
Tips:
- You can link a student to multiple lessons. Simply run the
linkTocommand repeatedly. LESSON_NAMEis case-insensitive. This means that "CS2103T Lab" and "cs2103T lab" are treated as the same lesson.
As of now, you cannot unlink a lesson from a student. Use caution when running the linkTo command.
Example usages:
linkTo CS2103T Lab
Success outputs:
- Input:
linkTo CS2103T Lab
Linked Alex Wong to CS2103T Lab
Failure outputs:
- Current state: In the 👨🎓 STUDENTS list and no student is selected
- Input:
linkTo CS2103T Lab- Error: A student is not yet selected. Select a student using
show INDEXfirst.
- Error: A student is not yet selected. Select a student using
No student is shown
LinkTo command usage: linkTo LESSON_NAME
Example: linkTo CS2103T lab1
Note: This command is only available when a student is shown
- Current state: In the 👨🎓 STUDENTS list and a student is selected
- Input:
linkTo CS2109 Lab- Error: No such lesson with the name "CS2109 Lab". Make sure the lesson's name is correct and try again.
No such lesson
For Schedule:
You must be in the 📅 SCHEDULE list and are viewing a lesson to run this command. Type list schedule to go to the 📅 SCHEDULE list, then type show INDEX to select a lesson to link students to.
linkTo STUDENT_NAME STUDENT_NAMEis the name of the student you would like to link to.- Refer to
STUDENT_NAME's constraints here.
Tips:
- You can link a lesson to multiple students. Simply run the
linkTocommand repeatedly. STUDENT_NAMEis case-insensitive. This means that "Alex Yeoh" and "alex yeoh" are treated as the same student.
As of now, you cannot unlink a student from a lesson. Use caution when running the linkTo command.
Example usages:
linkTo Bernice Yu
Success outputs:
- Input:
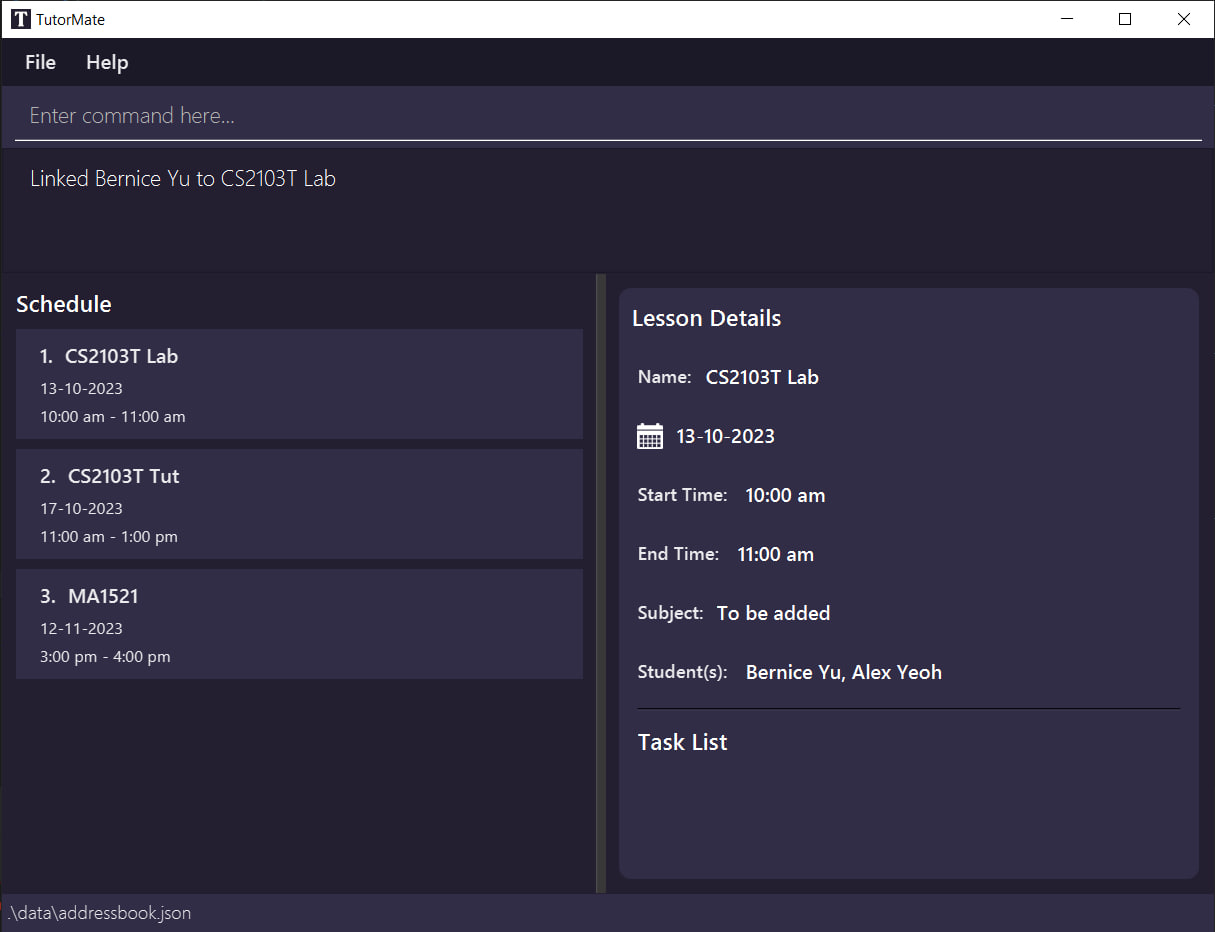
linkTo Bernice Yu
Linked Bernice Yu to CS2103T Lab
Failure outputs:
- Current state: In the 📅 SCHEDULE list and no lesson is selected
- Input:
linkTo Bernice Yu- Error: A lesson is not yet selected. Select a lesson using
show INDEXfirst.
- Error: A lesson is not yet selected. Select a lesson using
No lesson is shown
LinkTo command usage: linkTo STUDENT_NAME
Example: linkTo Alice Pauline
Note: This command is only available when a lesson is shown
- Current state: In the 📅 SCHEDULE list and a lesson is selected
- Input:
linkTo Bernice Yong- Error: No such student with the name "Bernice Yong". Make sure the student's name is correct and try again.
No such student with name Bernice Yong found
For Task:
This feature is not used for tasks!
Navigate Feature
After linking students to lessons or vice versa, you can "navigate" between the student and their linked lessons, or the lesson and its linked students. This comes in handy when you want to view the details of students in a lesson, or see what lessons a student has upcoming.
Format: nav
For Student:
You must be in the 👨🎓 STUDENTS list and are viewing a student to run this command. Type list students to go to the 👨🎓 STUDENTS list, then type show INDEX to select a student.
Tips:
- The student must have at least one linked lesson for the command to work.
Example usages:
nav
Success outputs:
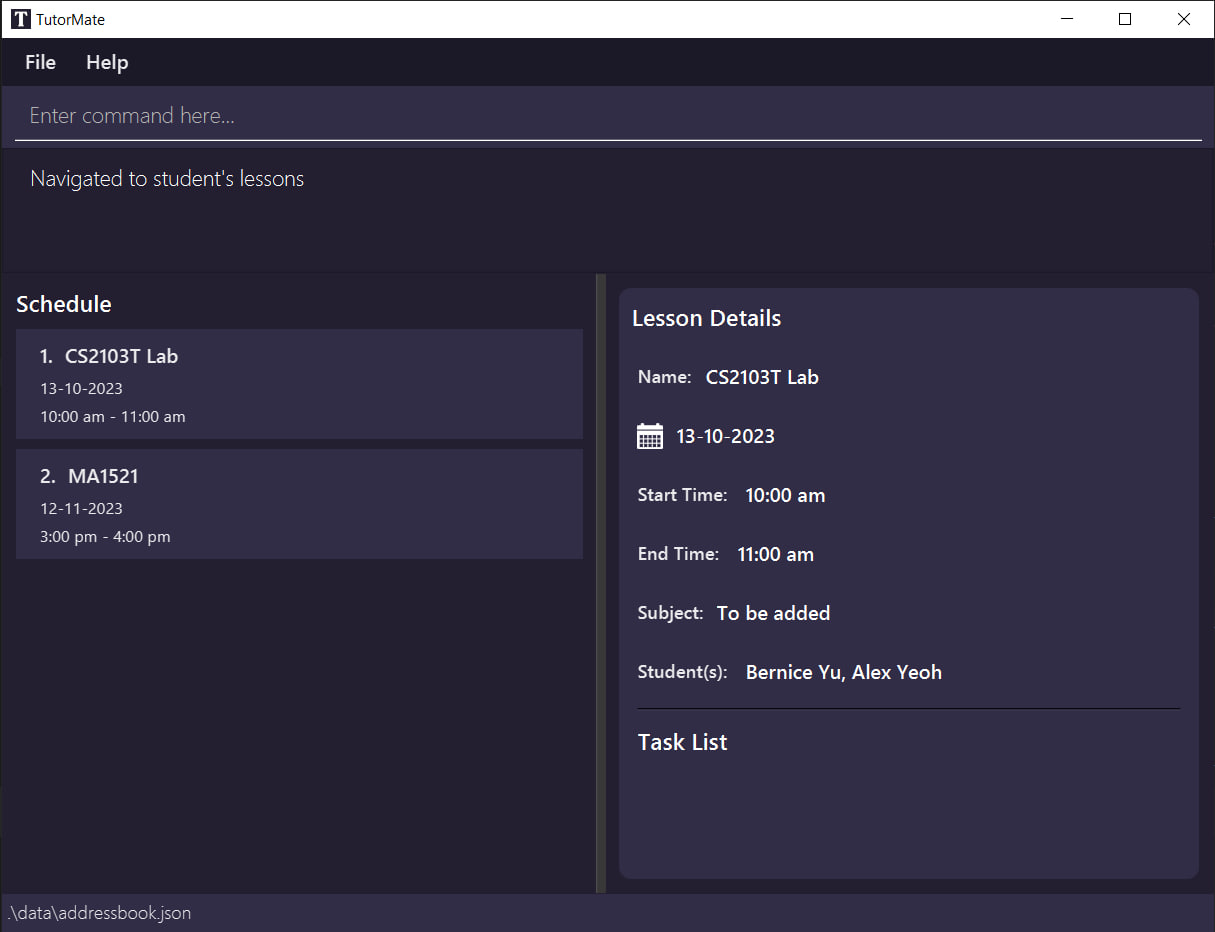
- Input:
nav
Navigated to student's lessons
Failure outputs:
- Current state: In the 👨🎓 STUDENTS list and a student is not selected
- Input:
nav- Error:
navonly works when a student is selected. Select a student with theshow INDEXcommand and try again.
- Error:
No student is currently displayed
- Current state: In the 👨🎓 STUDENTS list and a student without any linked lessons is selected
- Input:
nav- Error:
navonly works when a student has linked lessons. Link a lesson with thelinkTocommand.
- Error:
This student has no linked lessons
For Schedule:
You must be in the 📅 SCHEDULE list and are viewing a lesson to run this command. Type list schedule to go to the 📅 SCHEDULE list, then type show INDEX to select a lesson.
Tips:
- The lesson must have at least one linked student for the command to work.
Example usages:
nav
Success outputs:
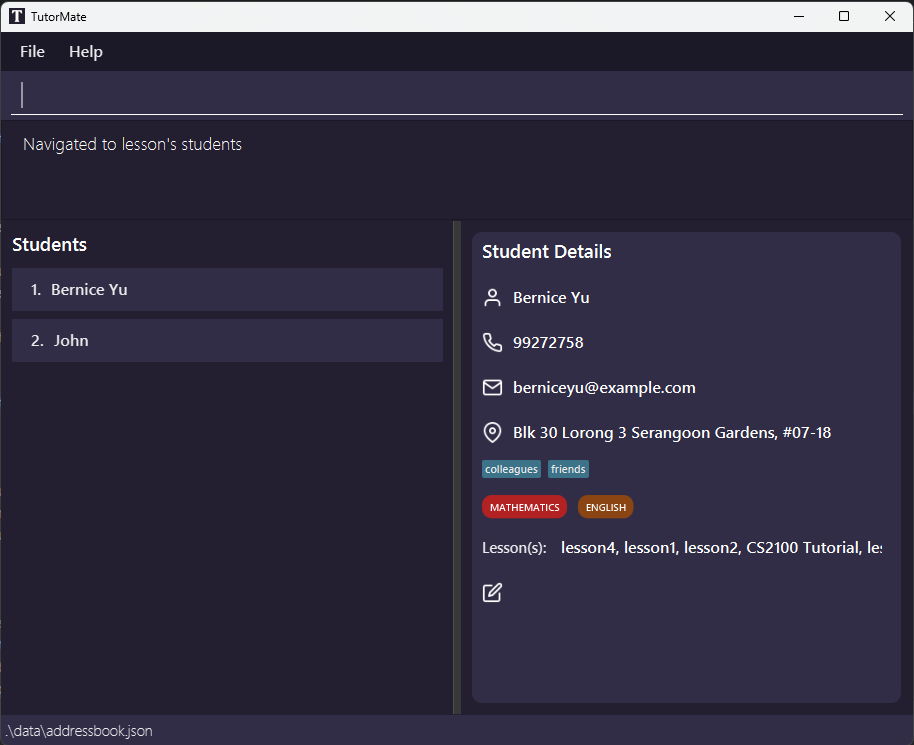
- Input:
nav
Navigated to lesson's students
Failure outputs:
- Current state: In the 📅 SCHEDULE list and a lesson is not selected
- Input:
nav- Error:
navonly works when a lesson is selected. Select a lesson with theshow INDEXcommand and try again.
- Error:
No lesson is currently displayed
- Current state: In the 📅 SCHEDULE list and a lesson without any linked students is selected
- Input:
nav- Error:
navonly works when a lesson has linked students. Link a student with thelinkTocommand.
- Error:
This lesson has no linked students
For Task:
This feature is not used for tasks!
Command History Feature
The command history feature allows you to retrieve previously typed commands into the command text box.
- To start navigating the command history, press the up ⇧ or down ⇩ arrow on your keyboard, which will point and return the most recent command text (for invalid commands, it will retrieve it again since it is also saved, hence it will not change the command text yet).
- Cycle through the command history using the up ⇧ arrow to go back to previous commands, and down ⇩ arrow to go to next commands, going beyond the command history will retrieve the oldest or newest command text for respectively.
Tips:
- Command history is only valid per session, it does not save into storage.
- Invalid commands are also saved into command history.
- During each successful command execution, the pointer8 resets again, hence pressing the up ⇧ or down ⇩ will point and return the most recent command text.
- Retrieved commands will replace the existing text in command box.
Caution:
- The index in command history remains when user clears the command box while scrolling through the history.
- e.g. For the history [
list tasks,list students,list schedule], if user retrieves the command history withlist studentsand clears his command box, pressing up ⇧ again will retrievelist tasks.
Example usages:
- Input:
list students,list schedule,list taskswere entered in this order.
- Pressing up ⇧ arrow will go back in the command history and retrieve:
list tasks. - Pressing up ⇧ arrow will go further back in the command history and retrieve:
list schedule. - Pressing down ⇩ arrow will go forward in the command history and retrieve:
list tasks.
Clearing Data
Clears the program data.
Format: clear
Exit Program
Exits the program.
Format: exit
View Help
Shows a message explaining how to access the help page. Click on the button to copy the link, enter it in a web browser to visit our user guide.

Format: help
Saving Data
TutorMate data is saved in the hard disk9 automatically after any command that changes the data. There is no need to save manually.
Editing Data File
TutorMate data is saved automatically as JSON10 files [JAR file location]/data/addressbook.json, [JAR file location]/data/schedulelist.json and [JAR file location]/data/personLessonMap.json. It is possible to update data directly by editing that data file, but we do not recommend doing so.
If you insist on modifying the data file directly, be very careful, especially when you modify attributes such as Start and End time of lessons, as any overlapping lesson timings will render the data as invalid. Scenarios like these are not exhaustive.
Caution: If your changes to the data file makes its format invalid, TutorMate will discard all data and start with an empty data file at the next run. Hence, it is recommended to take a backup of the file before editing it.
FAQ
Q: How do I install Java version 11?
A: You can follow the steps here to install Java 11 to your computer.
Q: How do I transfer my data to another Computer?
A: Copy TutorMate's jar file into the folder you want to use as the home folder5 in the other computer. Before running the application, copy addressbook.json, personLessonMap.json and schedulelist.json files from the home folder5 in your current computer into the home folder5 of the other computer. After copying the 3 files, running the application will show the same data. However, do note that the changes made through the application in one computer will not be reflected in the data in another computer.
Q: Can I edit the data in the application through the addressbook.json, personLessonMap.json, schedulelist.json files directly?
A: It is possible. However, it is not advisable for normal users to do so as if the changes made to the data file makes its format invalid, TutorMate will discard all data. Please use the edit command to make changes to your data instead. If you insist on directly modifying data files, please read this caution here.
Q: Can I still use the application without internet connection?
A: Yes, you can. TutorMate is an offline desktop application. The only exception is the help command which provides a URL11 to the user guide.
Known Issues
- When using multiple screens, if you move the application to a secondary screen, and later switch to using only the primary screen, the GUI 2 will open off-screen. The remedy is to delete the
preferences.jsonfile created by the application before running the application again.
Command Summary
| Action | List | Format | Examples | Remarks |
|---|---|---|---|---|
| List | Any | list [LIST] [KEYWORDS] | list students email, list schedule, list tasks | list without optional parameters displays the 📅 SCHEDULE list |
| Show | Any | show INDEX | show 1, show 3 | show will show the specified item at the given index of the current list |
| Add | Students(add), Any(addPerson) | addPerson -name NAME [-phone PHONE_NUMBER] [-email EMAIL] [-address ADDRESS] [-subject SUBJECTS] [-tag TAG] [-remark REMARK] | addPerson -name John -phone 91234567 -email test@gmail.com -address 10 Kent Ridge Drive -subject MATHEMATICS | NA |
| Add | Schedule(add), Any(addLesson) | addLesson -name NAME [-day DATE] [-start TIME] [-end TIME] [-subject SUBJECT] | addLesson -name Lesson at Tai Seng -start 09:00 -end 11:00 -day 03/21 -subject physics | NA |
| Add | Schedule | addTask [INDEX] DESCRIPTION | addTask 1 Make Forces Notes | NA |
| Delete | Students(delete), Any(deletePerson) | deletePerson INDEX | deletePerson 1 | NA |
| Delete | Schedule(delete), Any(deleteLesson) | deleteLesson INDEX | deleteLesson 1 | NA |
| Delete | Schedule | deleteTask INDEX | deleteTask 1 | show INDEX to show the lesson has to be used prior to deleteTask |
| Edit | Students(edit), Any(editPerson) | editPerson [INDEX] [-name NAME] [-phone PHONE_NUMBER] [-email EMAIL] [-address ADDRESS] [-subject SUBJECTS] [-tag TAG] [-remark REMARK] | editPerson 1 -subject physics -remark need urgent help | INDEX can be omitted when editing the currently shown person |
| Edit | Schedule(edit), Any(editLesson) | editLesson [INDEX] [-name NAME] [-day DATE] [-start TIME] [-end TIME] [-subject SUBJECT] | editLesson 2 -day 11/29 -start 14:30 -end 15:30 | INDEX can be omitted when editing the currently shown lesson |
| Find | Students, Schedule | find SEARCH_STRING | find bernice, find lesson | Disabled in 💼 TASKS list |
| Filter | Students | filter [-name NAME] [-subject SUBJECTS] [-tag TAG] [-remark REMARK] | filter -name Alex -tag primary -subject Mathematics | NA |
| Filter | Schedule | filter [-name NAME] [-subject SUBJECTS] [-before DATE] [-on DATE] [-after DATE] [-remark REMARK] | filter -before 2023/12/20 -subject Mathematics | NA |
| Link | Students, Schedule | link -student STUDENT_NAME -lesson LESSON_NAME | link -student Alex Yeoh -lesson CS2103T Lab | There is no way to unlink lesson to student |
| Link | Students | linkTo LESSON_NAME | linkTo CS2103T Lab | There is no way to unlink lesson to student |
| Link | Schedule | linkTo STUDENT_NAME | linkTo Bernice Yu | There is no way to unlink student to lesson |
| Navigate | Students, Schedule | nav | nav | Student/Lesson should have at least one linked lesson/student |
Glossary
| id | Term | Definition |
|---|---|---|
| 1 | CLI | Abbreviation for Command Line Interface, which allow user to interact with the application by inputting commands, and receive feedback from the application in the form of text. |
| 2 | GUI | Abbreviation for graphical user interface, which allow user to interact with with the application via graphical components such as icons, buttons, and menus. |
| 3 | Java | A programming language that you need to install before you are able to launch TutorMate. You could refer to FAQ for tips on how to verify whether you already have Java installed and how to install it. |
| 4 | Command Terminal | A text based user interface where most of the interaction is done by inputting commands. You can search for "terminal" to find and launch the inbuilt terminal in your operating system (Windows, Linus and MacOS). |
| 5 | Home Folder | The folder TutorMate is located at while running. This will be the folder where TutorMate read the date from and write the data to. |
| 6 | Code Injection | A computer attack in which malicious code is inserted into an application program. |
| 7 | String | A sequence of characters. Can be taken as just any text. |
| 8 | Pointer | A variable that stores the memory address of another variable. |
| 9 | Hard Disk | The long term storage device of the computer. The memory will remain even after the computer is turned off. |
| 10 | JSON | Abbreviation for JavaScript Object Notation. It is a format for storing data |
| 11 | URL | Abbreviation for uniform resource locator. It is a reference to a web resource that specifies its location on a computer network and a mechanism for retrieving it. |