TutorMate Developer Guide
Acknowledgements
This project is based on the AddressBook-Level3 project.
Setting up, getting started
Refer to the guide Setting up and getting started.
Design
Architecture
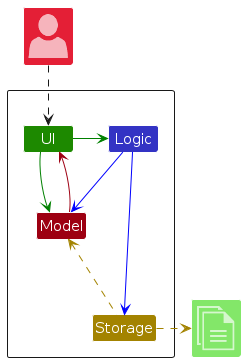
The Architecture Diagram given above illustrates the high-level design of the App.
You can see that the bulk of the app's works are done by the UI, Logic, Model and Storage components. Below are the general duties of each component and how they interact with each other.
Duties of each component
UI is responsible for
- Rendering visuals to the user.
- Handling and responding to user interactions.
Logic is responsible for
- Interpreting the user command to find the corresponding strategies to execute.
- Parsing the user command to construct the corresponding parameters for the strategies.
- Executing the strategies to modify the data and state of the app.
- Updating the UI to reflect the changes in the data and state of the app.
Model is responsible for
- Providing accurate representation of the current data and state of the app
- Providing APIs for other components to access and modify the data and state.
Storage: is responsible for
- Loading the user data from the hard disk.
- Saving the user data to the hard disk.
How the architecture components interact with each other
UI:
- Delegates the interpretation of user command to the
Logiccomponent. - Relies on the
Modelcomponent to obtain the appropriate data to display.
- Informs
UIwhat to display. - Utilises
Modelto access and modify the current data and state - Instructs
Storageto save data to the hard disk.
- Provides APIs for
LogicandUIto access and modify the data. - Depends on
Storageto load data from the hard disk to initialise.
- Provides APIs for
Logicto save data to the hard disk. - Provides APIs for
Modelto load data from the hard disk to initialise.
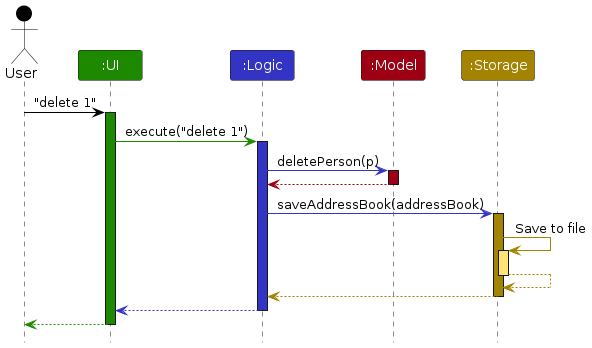
The Sequence Diagram below shows how the components interact with each other for the scenario where the user issues the command delete 1.
Other notes
Each of the four main components (also shown in the diagram above)
- Defines its API in an
interfacewith the same name as the Component. - Implements its functionality using a concrete
{Component Name}Managerclass (which follows the corresponding APIinterfacementioned in the previous point.
For example, the
Logiccomponent defines its API in theLogic.javainterface and implements its functionality using theLogicManager.javaclass.- Defines its API in an
The team has decided to force all components to interact via interfaces rather than the concrete classes as illustrated in the (partial) class diagram below (reason: to prevent outside component's being coupled to the implementation of a component).
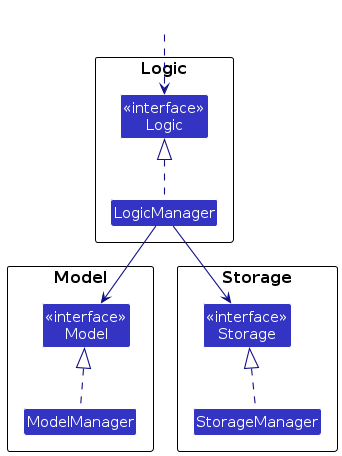
If you are to contribute to this project, please align with this group decision.
- There are other components that are not shown in the diagram above. These components are:
Commonscomponent: contains classes that are used by multiple other components.Entry Pointclasses:MainandMainAppclasses that are in charge of the app launch and shut down.
- Please be reminded that, despite similar naming, our architecture is not the Model-View-Controller (MVC) architecture. The major difference is that there is not a clear "Controller" component in our architecture. Instead, the role of the "Controller" is played by all the main components (UI, Logic, Model and Storage) working together.
The sections below give more details of each component.
Components
UI component
The API of this component is specified in Ui.java
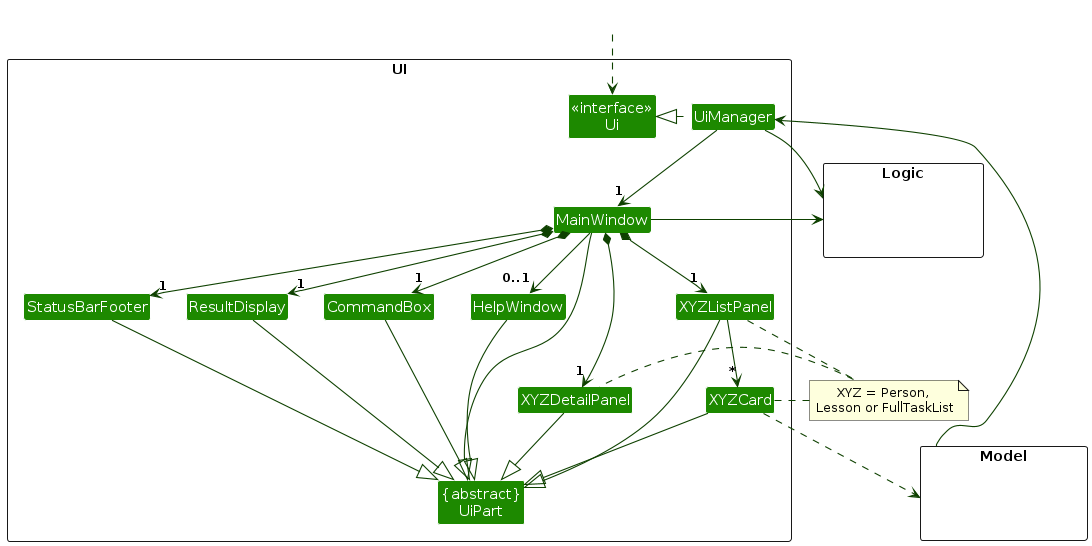
The UI consists of a MainWindow that is made up of parts e.g.CommandBox, ResultDisplay, PersonListPanel, StatusBarFooter etc. All these, including the MainWindow, inherit from the abstract UiPart class which captures the commonalities between classes that represent parts of the visible GUI.
The UI component uses the JavaFx UI framework. The layout of these UI parts are defined in matching .fxml files that are in the src/main/resources/view folder. For example, the layout of the MainWindow is specified in MainWindow.fxml
The UI component,
- executes user commands using the
Logiccomponent. - listens for changes to
Modeldata so that the UI can be updated with the modified data. - keeps a reference to the
Logiccomponent, because theUIrelies on theLogicto execute commands. - depends on some classes in the
Modelcomponent, as it displaysPersonobject residing in theModel. - consists of 2 sides: the left side being the lists section and the right side being the details section.
- depends on the
Stateof the app currently to show the appropriate list panels.
Logic component
API : Logic.java
At a high level, the Logic component is responsible for making sense of the user inputs, and modifying storage and ui accordingly.
It acts like a controller to glue the other components together.
It interacts with the UI component by taking the user input from it, and setting the UI display accordingly.
It also calls APIs (addPerson, deleteLesson for example) from the Model component to modify the data representation, and call APIs
from the Storage component to save the data to local storage each time the data is modified.
The sequence diagram below illustrates the interactions within the Logic component, taking execute("delete 1") API call as an example.
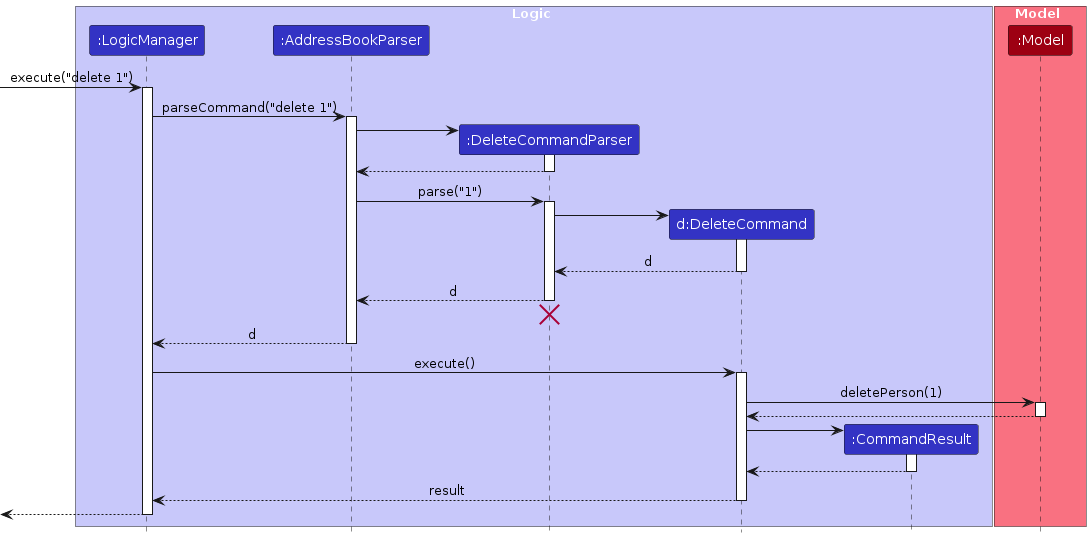
Note: The lifeline for DeleteCommandParser should end at the destroy marker (X) but due to a limitation of PlantUML, the lifeline reaches the end of diagram.
Inside the Logic component, there are 4 main components: LogicManager, AddressBookParser, Parser classes and Command classes.
The Command class will do the actual modification of the data, when executed by the LogicManager, and communicate its execution result via the CommandResult class with the LogicManager.
Parser classes are responsible for parsing the user input and creating the corresponding command object.
AddressBookParser is responsible for parsing the user input for finding the corresponding parser and returning the corresponding command object.
LogicManager will perform the actual execution of the command, and update the user interface and data storage.
Here's a (partial) class diagram of the Logic component:
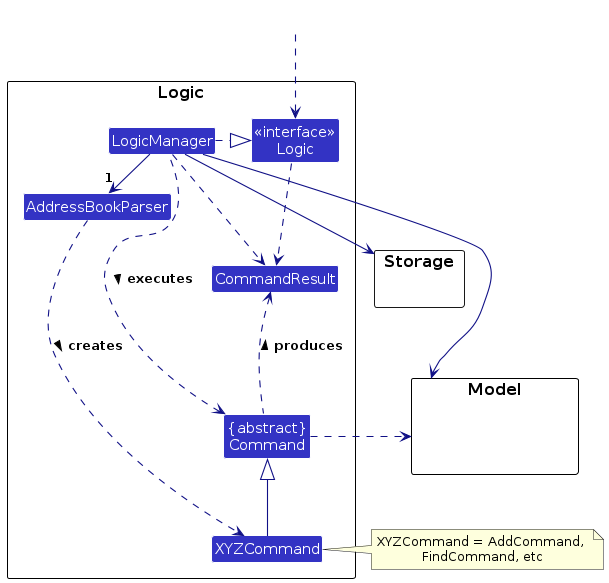
How the Logic component works:
- When
Logicis called upon to execute a command, it is passed to anAddressBookParserobject which in turn creates a parser that matches the command (e.g.,DeleteCommandParser) and uses it to parse the command. - This results in a
Commandobject (more precisely, an object of one of its subclasses e.g.,DeleteCommand) which is executed by theLogicManager. - The command can communicate with the
Modelwhen it is executed (e.g. to delete a person). - The result of the command execution is encapsulated as a
CommandResultobject which is returned back fromLogic.
Here are the other classes in Logic (omitted from the class diagram above) that are used for parsing a user command:
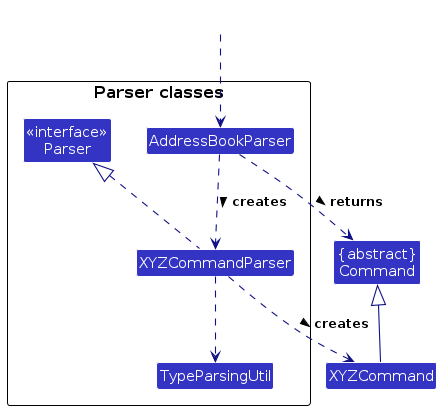
How the parsing works:
- When called upon to parse a user command, the
AddressBookParserclass creates anXYZCommandParser(XYZis a placeholder for the specific command name e.g.,AddCommandParser) which uses the other classes shown above to parse the user command and create aXYZCommandobject (e.g.,AddCommand) which theAddressBookParserreturns back as aCommandobject. - All
XYZCommandParserclasses (e.g.,AddCommandParser,DeleteCommandParser, ...) inherit from theParserinterface so that they can be treated similarly where possible e.g, during testing.
Model component
API : Model.java
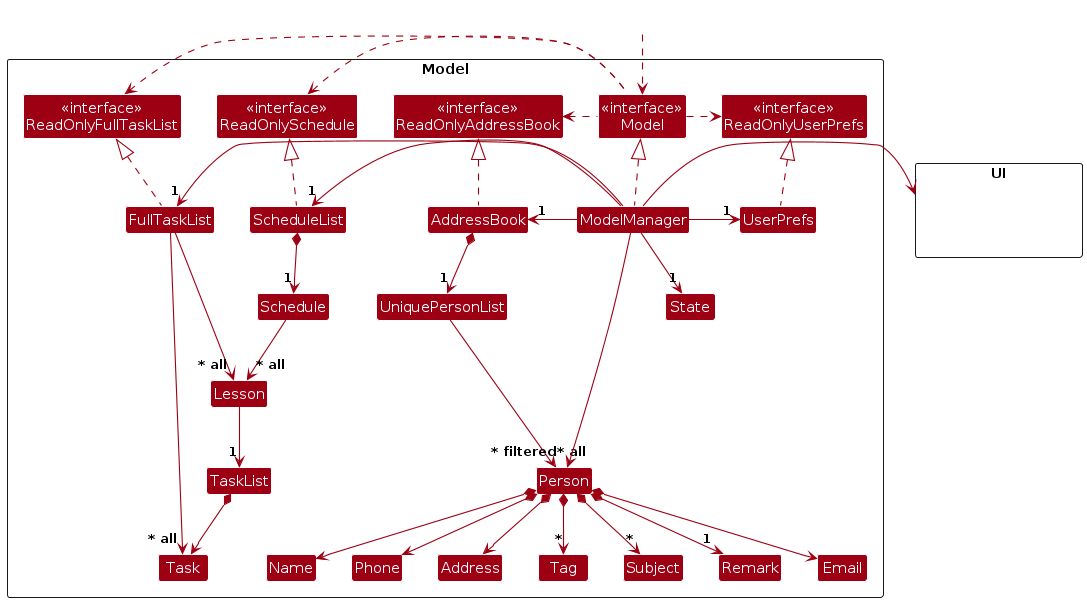
The Model component,
- stores the address book data i.e., all
Personobjects (which are contained in aUniquePersonListobject). - stores the schedule data i.e., all
lessonobjects (which are contained in aScheduleobject). - stores the currently 'selected'
Personobjects (e.g., results of a search query) as a separate filtered list which is exposed to outsiders as an unmodifiableObservableList<Person>that can be 'observed' e.g. the UI can be bound to this list so that the UI automatically updates when the data in the list change. - stores a
UserPrefobject that represents the user’s preferences. This is exposed to the outside as aReadOnlyUserPrefobjects. - stores the task data of all the lessons i.e., all
taskobjects (which are contained in theTaskListobjects of eachLessonobject). - does not depend on any of the other three components (as the
Modelrepresents data entities of the domain, they should make sense on their own without depending on other components). - links to the UI component to display the Show Details Panel in the UI (to reduce code complexity).
- stores a
Stateobject that represents the current state of the app. Currently, there are 3 main states:STUDENT,SCHEDULEandTASKstate.
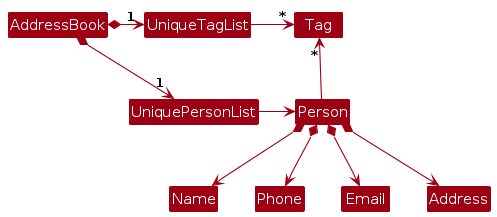
Note: An alternative (arguably, a more OOP) model is given below. It has a Tag list in the AddressBook, which Person references. This allows AddressBook to only require one Tag object per unique tag, instead of each Person needing their own Tag objects.
Storage component
API : Storage.java
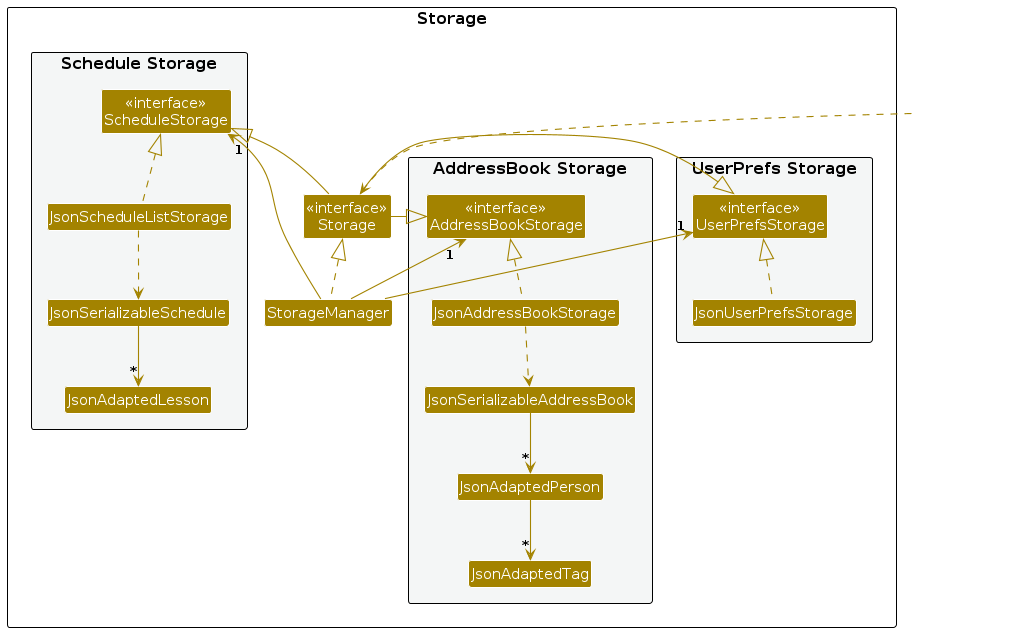
The Storage component,
- can save both address book data, user preference data, and schedule data in JSON format, and read them back into corresponding objects.
- inherits from both
AddressBookStorage,UserPrefStorageandScheduleStorage, which means it can be treated as either one (if only the functionality of only one is needed). - depends on some classes in the
Modelcomponent (because theStoragecomponent's job is to save/retrieve objects that belong to theModel)
Entry point classes
Main (consisting of classes Main and MainApp) is in charge of the app launch and shut down.
- At app launch, it initializes the other components in the correct sequence, and connects them up with each other.
- At shut down, it shuts down the other components and invokes cleanup methods where necessary.
Common classes
Commons represents a collection of classes used by multiple other components. They are in the seedu.addressbook.commons package.
Implementation
This section describes some noteworthy details on how certain features are implemented.
App State
Background
TutorMate has 3 main "modes" each to cater to the main features. We refer to them as "states", where we implement it using the State enum.
The different states have their own set of UI layout and commands, while some commands work for all states but has different behaviours between them.
The 3 main states are STUDENT, SCHEDULE and TASK.
STUDENTstate handles the student management system feature.SCHEDULEstate handles lessons and schedules.TASKstate handles tasks for lessons.
Implementation
The ModelManager class stores the current state of the app. The default state is SCHEDULE. It implements the following operations for the show command:
The ModelManager#getState() returns the current state of the app, ModelManager#setState() sets the app's state, and ModelManager#sameState() checks if the given state is the same as the app's state.
1. Parser Overloading
States allows the same command word to be mapped to different commands based on the current app state. AddressBookParser#parseCommand() handles the parsing of user input into its respective parsers and commands.
For example, the "add" command word is overloaded, where using the ModelManager#sameState() method:
- If it's in
STUDENTstate, it returns theAddPersonCommandParser, which returns theAddPersonCommandcommand class. - If it's in
SCHEDULEstate, it returns theAddLessonCommandParser, which returns theAddLessonCommandcommand class.
2. Command Overloading
States allows the same command to have differing behaviours based on the current app state.
Commands can easily enable this by modifying its execute method and implement a switch statement that executes different functions based on the model state.
For example, the "find" command is overloaded, where using the ModelManager#sameState() method:
- If it's in
STUDENTstate, it searches through the list of students. - If it's in
SCHEDULEstate, it searches through the list of lessons.
3. UI updates
When commands change the app state (i.e. model state), using the ModelManager#setState() method, it will automatically call the UiManager class to make necessary UI changes.
The UiManager class calls the MainWindow#changeLayout() method to make necessary changes to the layout based on the new state:
- If the new state is
STUDENTstate, only show thePersonList(list for students) andstudentDetailList. - If the new state is
SCHEDULEstate, only show theScheduleListandlessonDetailList. - If the new state is
TASKstate, only show thefullTaskListandtaskDetailListPanel.
Example execution
Given below is an example usage scenario of the addPerson command changes the model state and UI layout.
Step 1. The user launches the application for the first time. The initial state of the Model will be set to SCHEDULE. The schedule list will be initialized with the initial schedule.
Step 2. User enters the command addPerson -name Alice. The execute method of the AddPersonCommand will be called by the logicManager. The execute command will call the addPerson method in the ModelManager class to add a new person to the app.
Step 3. AddPersonCommand will change the app state to STUDENT by calling the ModelManager#setState() method, which changes the model state to STUDENT.
Step 4. Since the current model state is SCHEDULE, the ModelManager#setState() method will call the UiManager#changeLayout() method, which calls the MainWindow#changeLayout() method.
Step 5. The MainWindow#changeLayout() method will hide all panels and only show the PersonList (list for students) and studentDetailList.
Step 6. AddPersonCommand will then call the ModelManager#showPerson() method, which will display the newly added person's details (not shown in diagram, described in next section).
The following sequence diagram shows how the flow of the example execution:
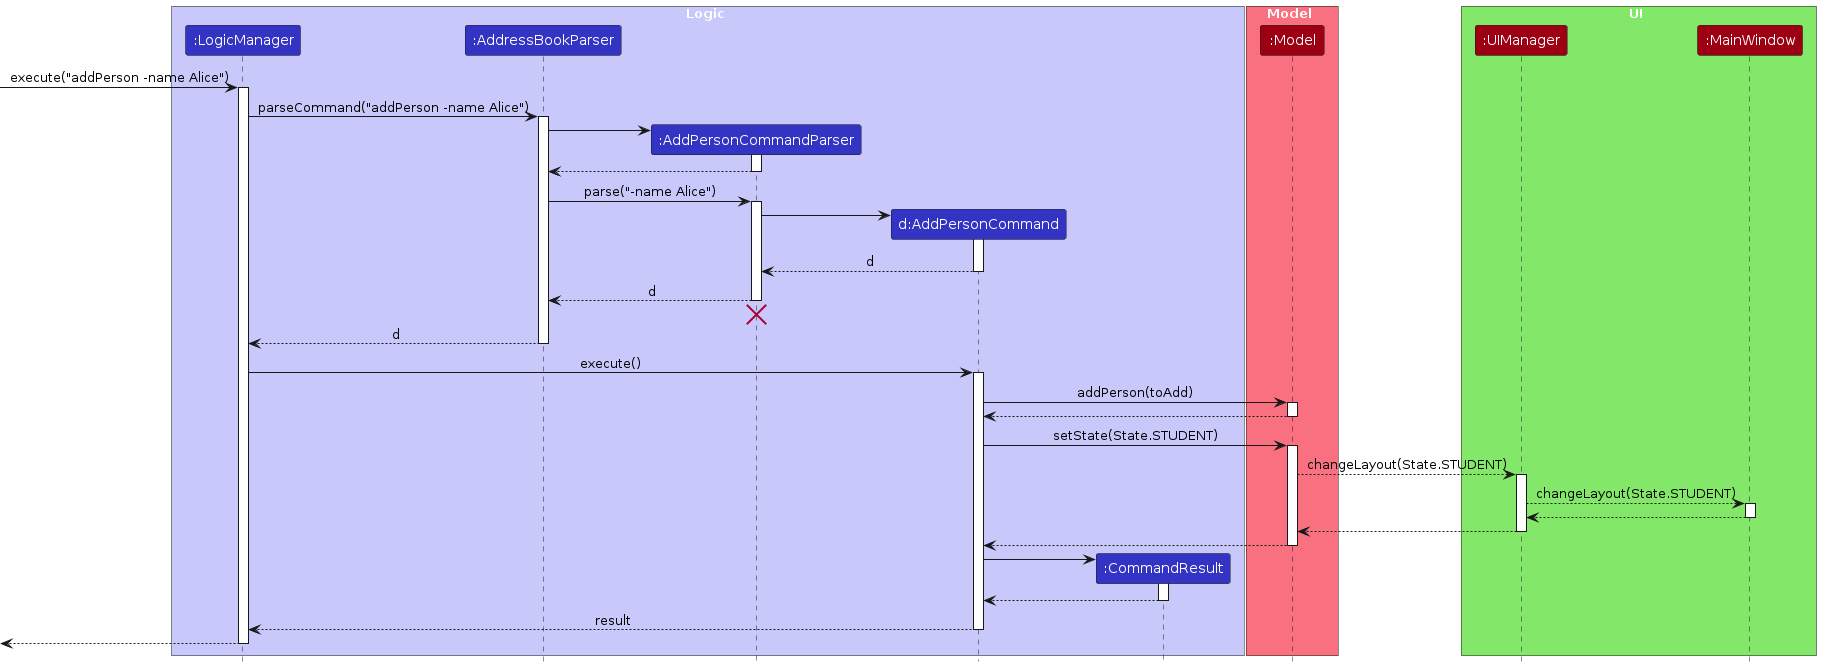
Note: The lifeline for AddPersonCommandParser should end at the destroy marker (X) but due to a limitation of PlantUML, the lifeline reaches the end of diagram.
Design considerations:
Aspect: How to structure app to work with the 3 main modes:
Alternative 1 (current choice): Implement app state, where commands can check and modify the current app state.
- Pros:
- Commands can be overloaded since they can have different behaviours based on app state, reducing number of commands for user to remember.
- Commands do not need to handle changing of UI layouts (specifying panels it requires), since similar features (e.g. managing students) all require the same panels. The
UiManagerwill make required UI changes based on desired state.
- Cons: Increase complexity of the code.
- Pros:
Alternative 2: Have a collection of related commands that are grouped to work with each main mode.
- Pros: Easy to implement
- Cons:
- Many commands for user to remember, although they have similar ideas (e.g.
addPerson,addLessonboth involving adding a new object, which the user could have used a genericaddmethod.) - Commands have to manually call the UI to specify which UI panels to show.
- Many commands for user to remember, although they have similar ideas (e.g.
EditPersonCommand and Parser
Background
To boost usability and support more functionalities, many commands in TutorMate support multiple forms of valid user input.
For example, when editing a person, the INDEX parameter can be conditionally omitted when editing the currently shown entry, the edit command word is overloaded for both editLesson and editPerson command, and for each of these two commands, many optional flags are available.
Given this flexibility and variety of valid user input, it is a challenge to parse all form of valid user input correctly and efficiently.
The implementation of the EditPersonCommand and EditPersonCommandParser can serve as a good example to represent how we tackle this challenge at command and parser class level to achieve the desired flexibility and usability while keeping the code clean and maintainable.
Implementation
The parsing and execution process of the EditPersonCommand is achieved via the combination of four groups of classes: AddressBookParser, TypeParsingUtil, EditPersonCommandParser and EditPersonCommand, each of which is responsible for a different stage of the parsing process.
Given a user input that is intended to be parsed into an EditPersonCommand, a high level description of the parsing process is as follows:
The first stage is to understand that user intends to invoke the EditPersonCommand and delegate the parsing to the specialised parser class, EditPersonCommmandParser. This step is done by the AddressBookParser class, which behaves like a "simple factory" via a giant "switch" statement. We will not discuss it in depth here.
The second stage is to parse each parameter and flags. This work is delegated to the TypeParsingUtil class, which is a utility class that contains many static methods that are responsible for parsing different types of user input that is reused across different command parsers.
Then, the EditPersonCommandParser class is responsible for combining the results of the previous stage and constructing the EditPersonCommand object.
Finally, the EditPersonCommand class is responsible for executing the command and updating the model accordingly.
The following section will discuss the implementation of the later three groups of classes in more detail.
1. ListEntry and ListEntryField class
In TutorMate, Lesson and Person extends ListEntry class as they are displayed as items of the STUDENTS list, SCHEDULE list respectively.
Each ListEntry object contains a list of ListEntryField objects, which are the fields of the ListEntry object. For example, a Person object contains a list of ListEntryField objects, which are the fields of the Person object, such as name, phone number, email address, etc.
These two classes are used in multiple generic classes and methods to achieve the flexibility and robustness of the parsing process.
2. Parsing of Flags and Parameters
The TypeParsingUtil class parses all kinds of flags (which are all ListEntryField ) via a single powerful generic method, parseField. The method signature is as follows:
 public static <T extends ListEntryField> T parseField(String flagName,
                                                          String input,
                                                          Of<T> of,
                                                          boolean isOptional) throws ParseException
The first parameter, flagName, is the name of the flag that is being parsed. It will also be used to generate the error message when the parsing fails.
The second parameter, input, is the user input that is intended to be parsed into the flag.
The third parameter, of, is a self-defined functional interface that is to be used as the "factory" to create the flag object. The of method signature is as follows:
public interface Of<T extends ListEntryField> {
    T apply(String str) throws IllegalArgumentException, ParseException;
}
The last parameter, isOptional, is a boolean flag that indicates whether the flag is optional or not. If the flag is not found in the user input, this method will throw a ParseException if the flag is not optional, but will return a null object if the flag is optional. It is overloaded to have a default value of true when omitted.
The parseField method is reused extensively in multiple parser classes to parse all the flags. The following is an example of how it can be used:
// Parse the name flag, which is compulsory
Name name = TypeParsingUtil.parseField("name", args, Name::of, false);

// Parse the phone flag, which is optional
Phone phone = TypeParsingUtil.parseField("phone", args, Phone::of);
3. Parsing of the EditPersonCommand
The EditPersonCommandParser class will parse the user input into an EditPersonCommand object.
This is achieved by combining the results of parsing flags in the previous stage and construct a Person object that contains the updated fields.
Each of the ListEntryField has a global and static singleton default instance. For example, the default Phone is a Phone object with message "To be added". Please also note that it is not possible to create a Phone object with such message via public constructor and factory method.
Each of the ListEntry also has a global and static singleton default instance whose fields are all the default ListEntryField objects. We can obtain a clone of the default ListEntry object via a static method in the class method.
The EditPersonCommandParser class will first obtain a clone of the default Person object via the getDefault method, and then update the fields of the Person object with the results of parsing flags in the previous stage when the corresponding flags are found in the user input.
The following is an example of how it can be used:
Person person = Person.getDefaultPerson();
            person.setNameIfNotDefault(parseField("name", args, Name::of, nameIsOptional));
            person.setPhoneIfNotDefault(parseField("phone", args, Phone::of));
            person.setEmailIfNotDefault(parseField("email", args, Email::of));
            person.setAddressIfNotDefault(parseField("address", args, Address::of));
            person.setSubjectsIfNotDefault(parseField("subject", args, Subjects::of));
            person.setTagsIfNotDefault(parseField("tag", args, Tags::of));
            person.setRemarkIfNotDefault(parseField("remark", args, Remark::of));
4. EditPersonCommand Implementation
The EditPersonCommand class will execute the command and update the model accordingly.
Realising the commonality between all kinds of edit commands, we have created an abstract generic class, AbstractEditCommand, to serve as template class containing the logic of editing a ListEntry object.
The signature of the AbstractEditCommand class is as follows:
public abstract class AbstractEditCommand<T extends ListEntry<? extends T>> extends Command
And the concrete edit classes (EditPersonCommand class for example) can be simply implemented by "filling in the blank" and providing the correct parameters to the template class.
The template for the edit process is as follows:
initModelMethods();
init();
editFields();
updatePersonLessonMap();
validateEditedAndWriteBack();
showMethod.accept(edited);
return new CommandResult("Edit success.\n from: " + original.toString() + "\n to: " + edited.toString());
The EditPersonCommand class can be simply implemented by overriding the abstract methods in the AbstractEditCommand class.
The most important method to be overridden is the initModelMethods(), which looks like this in the EditPersonCommand class:
 @Override
    protected void initModelMethods() {
        currentShownEntry = model.getCurrentlyDisplayedPerson();
        list = model.getFilteredPersonList();
        hasClashWith = model::hasPersonClashWith;
        deleteMethod = model::deletePersonForEdit;
        addMethod = model::addPerson;
        getClashingEntry = model::getPersonClashWith;
        showMethod = model::showPerson;
    }
Design considerations:
**Aspect: How to keep the code clean and maintainable while providing the flexibility and variety of valid user input.
Alternative 1 (current choice): Group the parsing and execution of a command into four groups of classes:
AddressBookParser,TypeParsingUtil,EditPersonCommandParserandEditPersonCommand.- Pros:
- Clear separation of concerns.
- Easy to maintain, easy to extend as for each new
ListEntryFieldandListEntryclass that is added and fulfill the contract of theListEntryFieldandListEntryclass, the parsing and execution of the command will almost be automatically supported. - Good DRY principle. Only one method is needed to parse all kinds of flags, the knowledge of a given type of processing is encapsulated in a single place.
- Cons: Less flexible. It is not easy to add flags that have special parsing logic not supported by the current template.
- Pros:
Alternative 2: Having even stricter constraints on the
ListEntryFieldandListEntryclass, so that we can use reflection feature of Java to automatically parse the flags.- Pros: Potentially better extensibility.
- Cons:
- Difficult to implement.
- Even more difficult to debug.
- Even less flexible.
- Not easy to get the correct error message and type, as if the call via reflection throws exception,
ParseExceptionfor example, the reflection call will always overwrite the original exception and throw anInvocationTargetExceptioninstead.
Alternative 3: Writing a separate parser class for each command.
- Pros: Flexible. Easy to implement.
- Cons:
- Many redundant code.
- Difficult to maintain as the code is not DRY.
Show feature
Implementation
The show feature is facilitated by ShowCommand which extends the abstract Command class. The ShowCommand will check the current state of the Model (either STUDENT, SCHEDULE, TASK or NONE) when the execute method is called and see whether it is currently showing a STUDENTS list, SCHEDULE list or a TASKS list.
Additionally, the ModelManager class implements the following operations for the show command:
ModelManager#linkUi() — Links the UI of TutorMate to the Model to display the Show Panel
ModelManager#showPerson() — Shows the details of the specified person in the UI.
ModelManager#showLesson() — Shows the details of the specified lesson in the UI.
ModelManager#showTask() — Shows the details of the specified task in the UI.
The Show Command has different behaviours based on the current state in the Model:
- The Show Command will show the Person Details if the current state is
STUDENT - The Show Command will show the Lesson Details if the current state is
SCHEDULE - The Show Command will show the Task Details if the current state is
TASK
The execute method of ShowCommand will be called by the logicManager when the show command is input.
Given below is an example usage scenario and how the show feature behaves at each step.
Step 1. The user launches the application for the first time. The initial state of the Model will be set to SCHEDULE. The schedule list will be initialized with the initial schedule.
Step 2. The user executes show 5 command to show the details of the 5th lesson in the schedule list. The execute method of the ShowCommand will be called by the logicManager. The execute command will call the showLesson method in the ModelManager which displays the LessonDetailListPanel in the UI.
Step 3. The user wants to display the details of a person and switches to the student list with the list students command in the Command Line Interface(CLI) UI. The current list will display the students and the Model state will change to STUDENT.
Step 4. The user executes show 1 command to show the details of the 1st person in the student list. The execute method of the ShowCommand will be called by the logicManager. The execute command will call the showPerson method in the ModelManager which displays the StudentDetailListPanel in the UI.
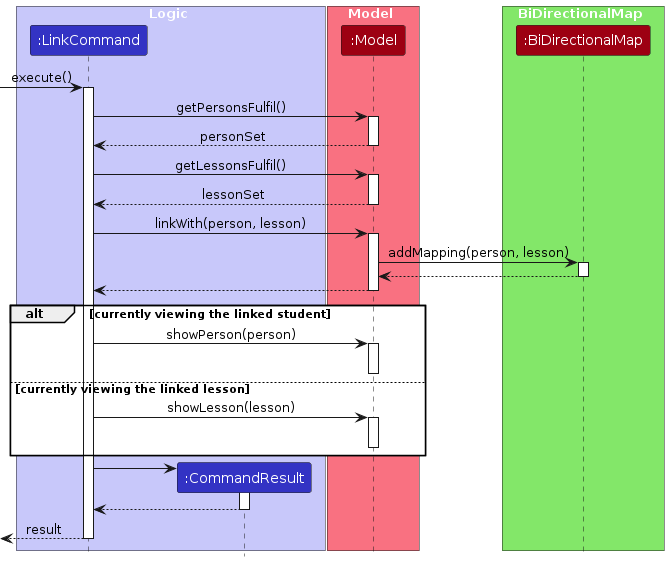
The following sequence diagram shows how the show operation works for showing a person from the STUDENT list:
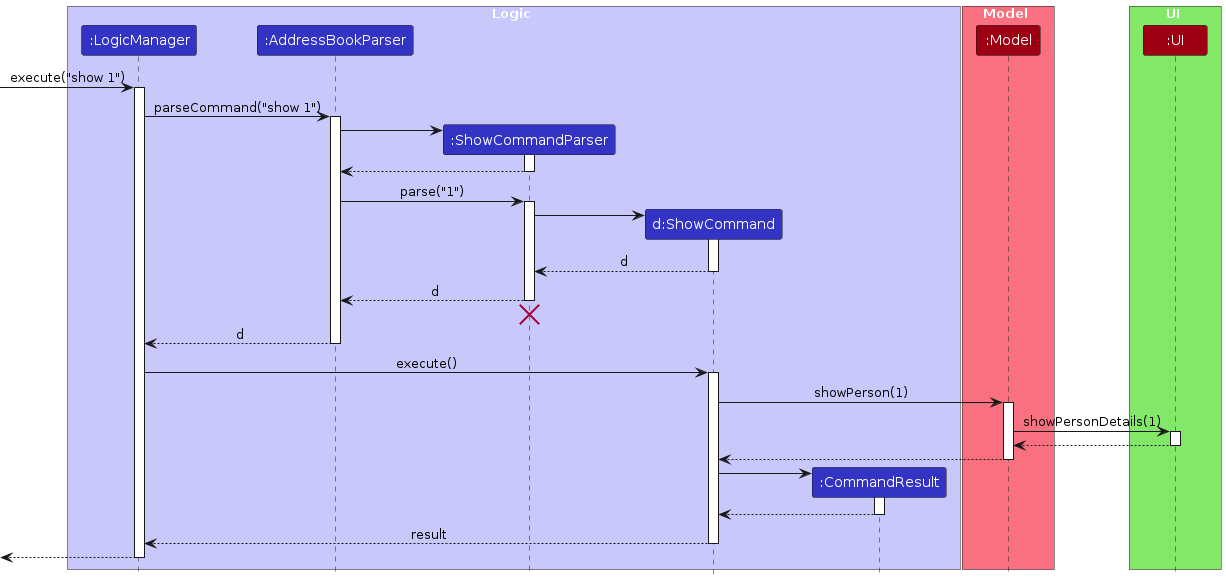
Note: The lifeline for ShowCommandParser should end at the destroy marker (X) but due to a limitation of PlantUML, the lifeline reaches the end of diagram.
Design considerations:
Aspect: How the Show Command calls the UI to display the Show Details Panel:
Alternative 1 (current choice): Link the Model with the UI to display the Show Details Panel.
- Pros: Easy to implement.
- Cons: May increase coupling between the Model and UI
Alternative 2: Pass the UI call from the Show Command around the currently linked files.
- Pros: No additional coupling created.
- Cons: Many files will have to be changed and will increase the complexity of the code.
Task List Feature
Implementation
The task list functionality is facilitated by multiple related classes. The TaskList can contain any number of Task objects. The TaskList is implemented as a component of each Lesson so that each lesson will have its own individual Task List.
The FullTaskList class is implemented as a list to view all the collective tasks of all the lessons. It uses a similar structure to ScheduleList to display the list.
Design considerations:
Aspect: How the Task List structure should be implemented:
Alternative 1 (current choice): Each individual Lesson will contain a Task List.
- Pros: Easy to implement.
- Cons: May be hard to increase navigability from students to lessons and tasks.
Alternative 2: Create a central Task List and filter the tasks for each lesson.
- Pros: May be easier to increase navigability.
- Cons: May increase code complexity due to filtering the respective tasks.
Linking Lessons to Students
Implementation
The Link feature is facilitated by the LinkCommand class, as well as the BiDirectionalMap class. As its name suggests, the BiDirectionalMap is a class that contains two maps, a "Forward" map and a "Reverse" map. The "Forward" map maps keys to values, and the "Reverse" map maps the values back to the keys.
This allows us to hold both a mapping of Person to Lesson and Lesson to Person at the same time.
The BiDirectionalMap class exposes a few useful methods such as addMapping, removeMapping, get and getReversed that help to manipulate both maps at once.
The Link Command supports two different commands depending on the current State:
- In either state, the command
linkallows linking of any specified student to any specified lesson - When in the STUDENTS list and a student is selected via
show INDEX, thelinkTocommand allows linking of the selected student to any specified lesson - When in the SCHEDULE list and a lesson is selected via
show INDEX, thelinkTocommand allows linking of the selected lesson to any specified student
When a user successfully runs either one of these commands, the app gets the relevant Person and the relevant Lesson from the ModelManager through a simple search using the names of each.
A check to ensure the entered student and lesson exists and that they are not already linked is carried out.
Then, BiDirectionalMap#addMapping() is called to create a map between the student and lesson.
Design considerations
Aspect: How the mapping of students to lessons should be handled
- Alternative 1:: Store the lessons that a student has in the
Personclass as anArrayList<Lesson>- Pros
- Easy to implement
- Cons
- Hard to implement reverse navigation (from lesson to student).
- Hard to prevent stale data. Suppose a lesson name is updated, which means the app will have to traverse each student's lessons and make sure to update the correct lesson. There needs to be sufficient conflict checking too. This increases code complexity.
- Hard to implement reverse navigation (from lesson to student).
- Pros
- Alternative 2 (current choice): Use a bidirectional map that links a student to lessons while also linking a lesson to a student
- Pros
- Allows for bidirectional navigation and easy updating
- Cons
- Requires more code to implement the updating of both maps.
- Serializing and deserializing requires a longer method to parse and generate both maps.
- Pros
Documentation, logging, testing, configuration, dev-ops
Appendix: Requirements
Product scope
Target user profile:
- Private Tuition Teachers
- has a need to manage a significant number of students
- Teaches multiple subjects
- prefer desktop apps over other types
- can type fast
- prefers typing to mouse interactions
- is reasonably comfortable using CLI apps
Value proposition: Helps private tuition teachers manage their students more easily. Faster access and storage of students’ contacts and data than a typical mouse/GUI driven app, provides better time management and productivity. The app will help to manage students for a single tuition teacher only.
User stories
Priorities: High (must have) - * * *, Medium (nice to have) - * *, Low (unlikely to have) - *
| Priority | As a … | I want to … | So that I can… |
|---|---|---|---|
* * * | new user | see usage instructions | refer to a user guide when I forget how to use the app |
* * * | new user | purge all existing sample data | get rid of the experimental data when exploring the app |
* * * | private tutor | install the app on my device with one click | use the app with ease without much trouble building the environment |
* * * | private tutor | add students by name only without having to include all their contact details | can keep tabs on potential students |
* * * | user | delete a student in the app's students list | remove entries that I no longer need |
* * * | user | find a student by name | locate details of students without having to go through the entire list |
* * * | tutor | quickly edit student details | save time re-adding students if I have added the wrong details by accident |
* * * | busy tutor | add lessons that fits into my schedule quickly | ensure that the newly added lesson do not clash with existing tuition sessions in my schedule |
* * * | flexible tutor | edit my student’s lesson timings | accommodate any changes in timing requested by them |
* * * | private tutor | see a specific student’s data from the contact list | get a more concise and detailed view of the student |
* * | private tutor | keep contact details of students hidden unless specified otherwise | minimize the chances of someone else seeing them by accident |
* * | tutor | see my teaching schedule | complete lesson preparation before the upcoming tuition sessions |
* * | efficient tutor | filter lessons to view lessons on or after a specific date | plan my activities with the free time that is not occupied by lessons |
* * | tutor | link a student to a lesson | prepare for the lesson according to the student's weaknesses and strengths |
* * | forgetful tutor | see all the planned lessons with a student | plan for additional lessons with the student |
* * | tutor | update my students' details as they progress through learning in remarks | keep track of their information like test scores and learning styles |
* | forgetful tutor | include certain tasks to do for each lesson | remember to do them in preparation for each lesson |
* | busy user | see all the tasks for all my tuition sessions at a glance | know how many tasks I have yet to complete in preparation for all my tuition sessions |
Use cases
(For all use cases below, the System is TutorMate and the Actor is the Tutor, unless specified otherwise)
Use case: Add a student [UC01]
MSS
- User chooses to add a new student.
- User enters the required details to create a student.
- TutorMate creates the student.
Use Case ends.
Extensions
- 2a. Student's name is not specified and / or details specified are incorrect.
- 2a1. The app informs the user of the error.
- 2a2. The user enters new data.
Use case resumes from step 2.
Use case: Delete a student [UC02]
MSS
- User requests to list students.
- TutorMate shows a list of students.
- User requests to delete a student in the list.
- TutorMate deletes the person.
Use case ends.
Extensions
- 2a. The list is empty (no students in student list).
Use case ends. - 3a. The given index is invalid.
- 3a1. TutorMate shows an error message.
Use case resumes at step 2.
- 3a1. TutorMate shows an error message.
Use case: Show a student [UC03]
MSS
- User requests to list students.
- TutorMate shows a list of students.
- User requests to see the details of a specific student.
- TutorMate shows the student.
Use case ends.
Extensions
- 2a. The list is empty (no students in student list).
Use case ends. - 3a. The given index is invalid.
- 3a1. TutorMate shows an error message.
Use case resumes at step 2.
- 3a1. TutorMate shows an error message.
Use case: Find & see a student with their details [UC04]
MSS
- User requests to find a student by a specific characteristic e.g. Name.
- TutorMate shows a list of students that matches the user's input.
- User shows a student (UC03)
Use Case ends.
Extensions
- 2a. The list is empty (no students found that matches the user's input).
Use case ends.
Use case: Edit a student's details [UC05]
MSS
- User requests to list students.
- TutorMate shows the student list.
- User chooses to edit a student and enters the data.
- TutorMate edits the student's details.
Use Case ends.
Extensions
- 3a. Some details are incorrect/ overlapping with existing app data.
- 3a1. The app informs the user of the error.
- 3a2. The user enters new data.
Use case resumes from step 3.
- 3b. The given index is invalid.
- 3b1. The app informs the user of the error.
- 3b2. The user enters new data.
Use case resumes from step 3.
Use case: Add a lesson [UC06]
MSS
- User requests to list schedule.
- TutorMate shows the schedule list.
- User enters the required details to create a lesson.
- TutorMate creates the lesson.
Use Case ends.
Extensions
- 3a. Lesson's name is not specified and / or details specified are incorrect.
- 3a1. The app informs the user of the error.
- 3a2. The user enters new data.
Use case resumes from step 3.
Use case: Add a task to a lesson [UC07]
MSS
- User requests to list schedule.
- TutorMate shows the schedule list.
- User enters the required details to create a task to a lesson.
- TutorMate creates the task in the task list of the lesson.
Use Case ends.
Extensions
- 2a. The list is empty (no lessons in schedule list).
Use case ends. - 3a. Description details are missing/ overlapping with existing app data.
- 3a1. The app informs the user of the error.
- 3a2. The user enters new data.
Use case resumes from step 3.
- 3b. The given index is invalid.
- 3b1. The app informs the user of the error.
- 3b2. The user enters new data.
Use case resumes from step 3.
Use case: Delete a task to a lesson [UC08]
MSS
- User requests to list schedule.
- TutorMate shows the schedule list.
- User requests to see the details of a lesson.
- TutorMate shows the lesson.
- User requests to delete a specific task in the lesson.
- TutorMate deletes the task.
Use Case ends.
Extensions
- 2a. The list is empty (no lessons in schedule list).
Use case ends. - 3a. The given lesson index is invalid.
- 3a1. The app informs the user of the error.
- 3a2. The user enters new data.
Use case resumes from step 3.
- 5a. The given task index is invalid.
- 5a1. The app informs the user of the error.
- 5a2. The user enters new data.
Use case resumes from step 5.
- 5b. The task list is empty (no tasks in the task list of the lesson).
Use case ends.
Non-Functional Requirements
Should work on any Windows, Linux, and MacOs as long as it has Java
11or above installed.Should be able to hold up to:
- 1000 persons without a noticeable(> 1 second) sluggishness in performance for typical usage.
- 1000 lessons without a noticeable(> 1 second) sluggishness in performance for typical usage.
- a total of 1000 tasks without a noticeable(> 1 second) sluggishness in performance for typical usage.
A user with above average typing speed for regular English text (i.e. not code, not system admin commands) should be able to accomplish most of the tasks faster using commands than using the mouse.
The application should respond and load all data within three seconds.
The response time for adding, updating, or deleting student and lesson records should be within two seconds.
The system should be usable with a user interface that is intuitive enough for users who have not used similar applications before.
Users will only have access to their own students' data.
Should there be an irregular termination of the app, the data should not be corrupted.
The app should respond to user text input within 0.2 second.
Data should be stored locally.
The application is not expected to:
- Perform analysis of students' academic performance.
- Send real-time notifications when there is an upcoming lesson.
- Delete lessons that are past the current date automatically.
Glossary
- GUI: Abbreviation for graphical user interface, which allow user to interact with with the application via graphical components such as icons, buttons, and menus.
- Private contact detail: A contact detail that is not meant to be shared with others
Appendix: Instructions for manual testing
Given below are instructions to test the app manually.
Note: These instructions only provide a starting point for testers to work on; testers are expected to do more exploratory testing.
Launch and Shutdown
Initial Launch
Download the latest
tutormate.jarfrom here and copy it into an empty folder.Open a command terminal,
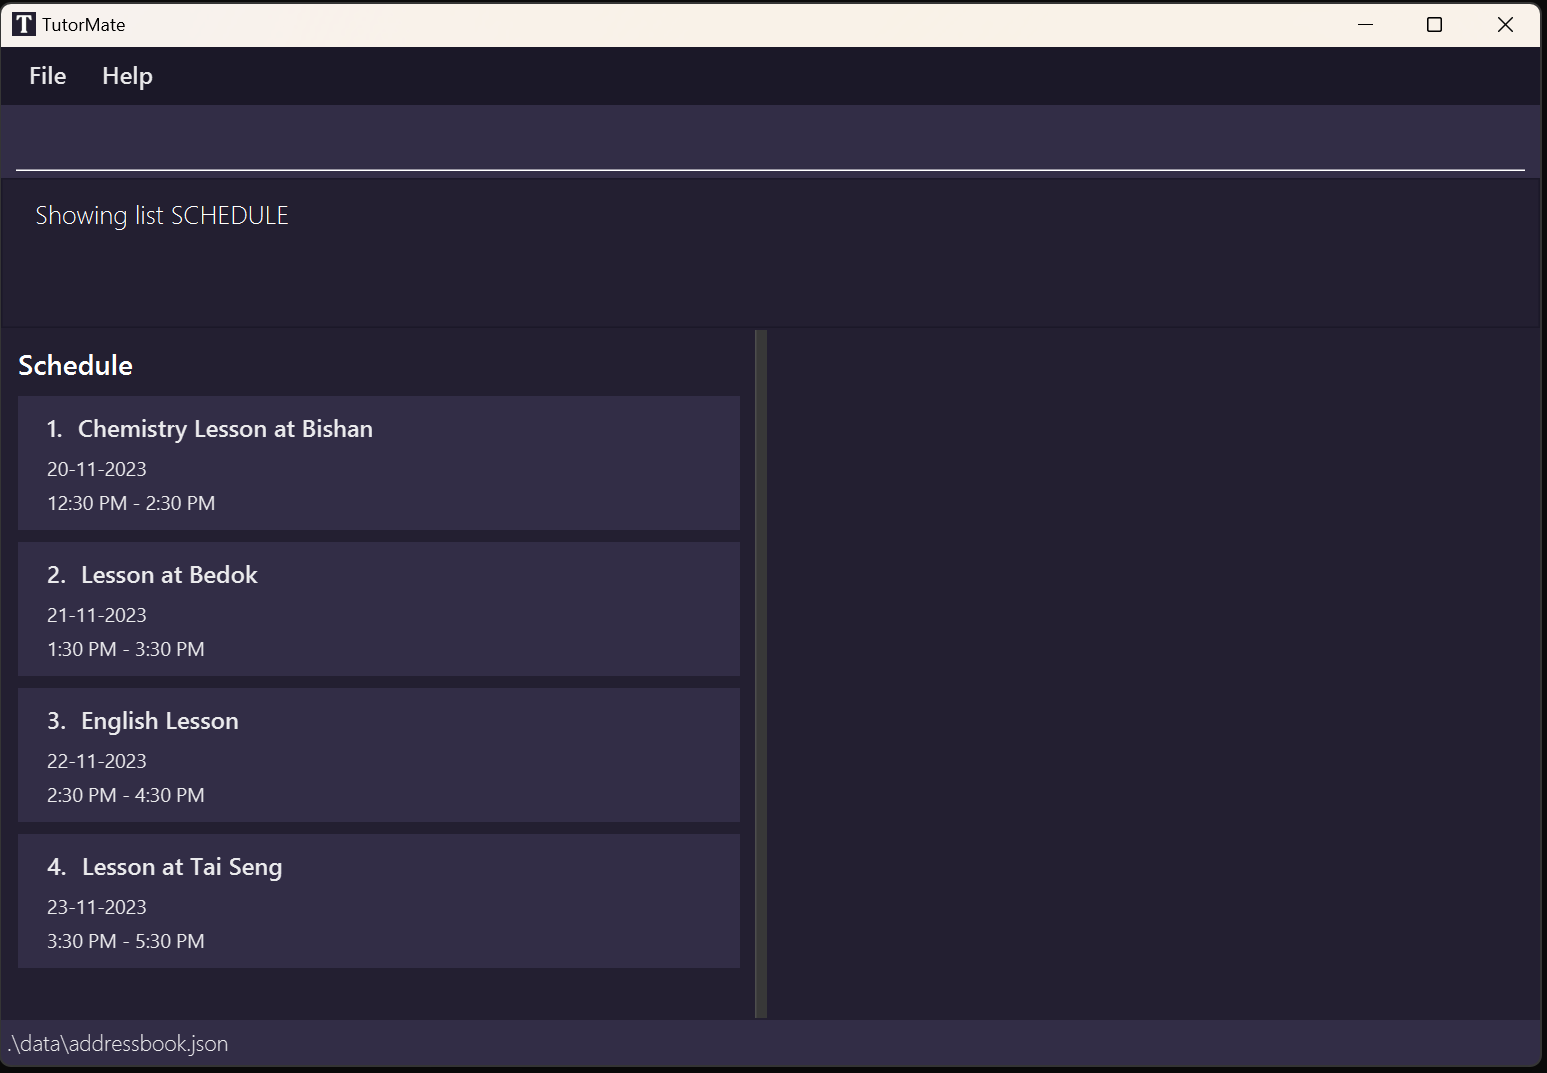
cdinto the folder you put the jar file in, and use thejava -jar tutormate.jarcommand to run the application.Expected: A GUI similar to the picture below should appear in a few seconds. The app will contain some sample data.
Shutdown
- Click on the cross at the top of the window.
- MacOs: Red cross button at top left side of the window.
- Windows & Linux: Cross button at the top right side of the window.
Expected: The application window disappears.
- Enter
exitinto the command box of the application.
Expected: The application window disappears.
- Click on the cross at the top of the window.
Subsequent Launches
Relaunch the application by
cdinto the folder withtutormate.jar.Use the
java -jar tutormate.jarcommand to run the application.Expected: The list panel will show a list of lessons similar to the picture above (in SCHEDULE list). The data in the application should be the same as the data in the application before it was shut down previously.
Saving Window Preferences
Resize the window to an optimum size. Move the window to a different location. Close the window.
Re-launch the application by using the
java -jar tutormate.jarcommand.
Expected: The most recent window size and location is retained.
Basic Usage
The app is split into 3 states:
STUDENTS list

SCHEDULE list (default)
TASKS list
Each state has its associated features, while certain features work with all states but has differing functionalities.
The STUDENTS list handles student details management, SCHEDULE list handles lessons, scheduling and the tasks for each lesson while the full TASKS list is a view to display all tasks.
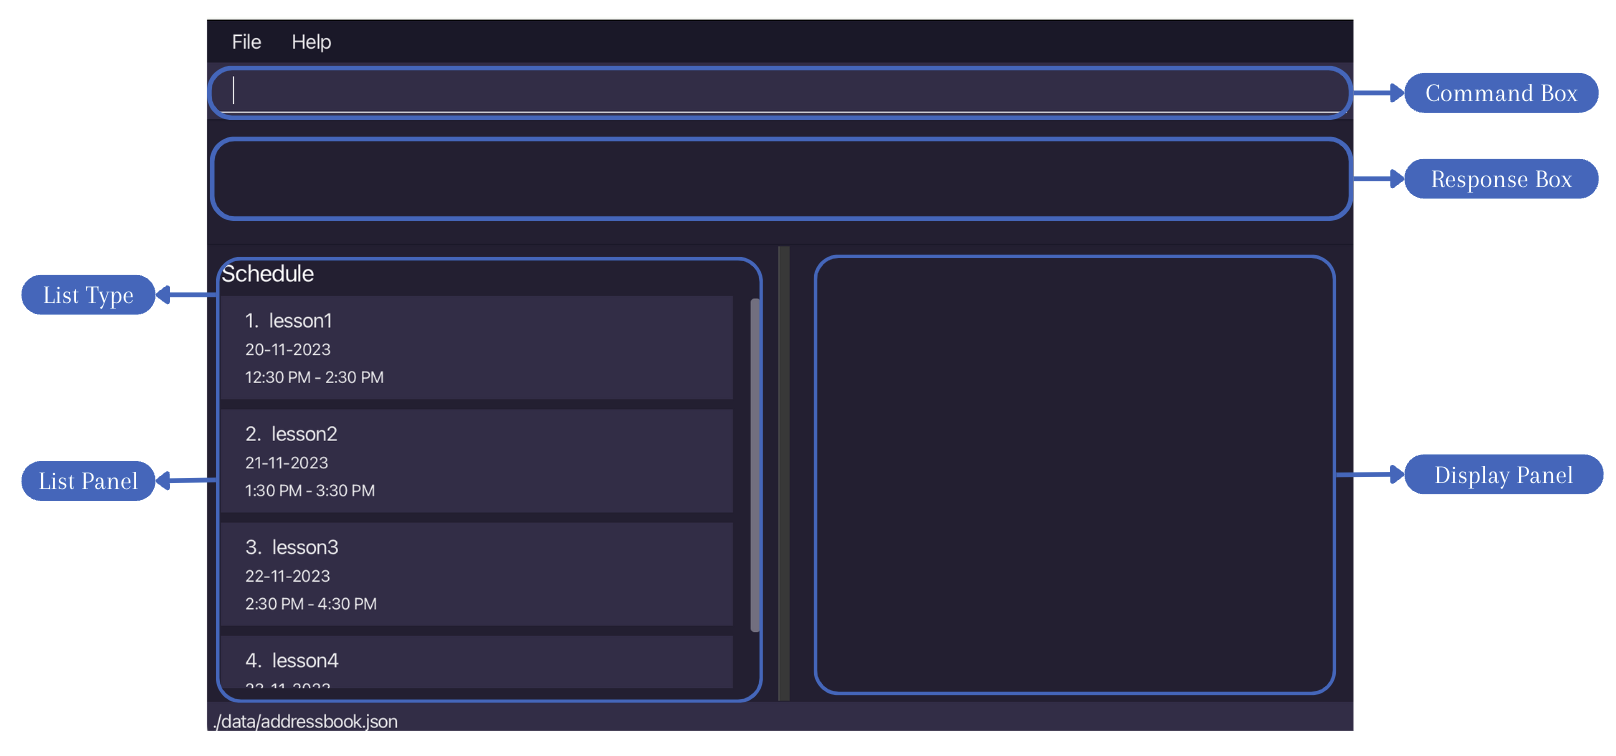
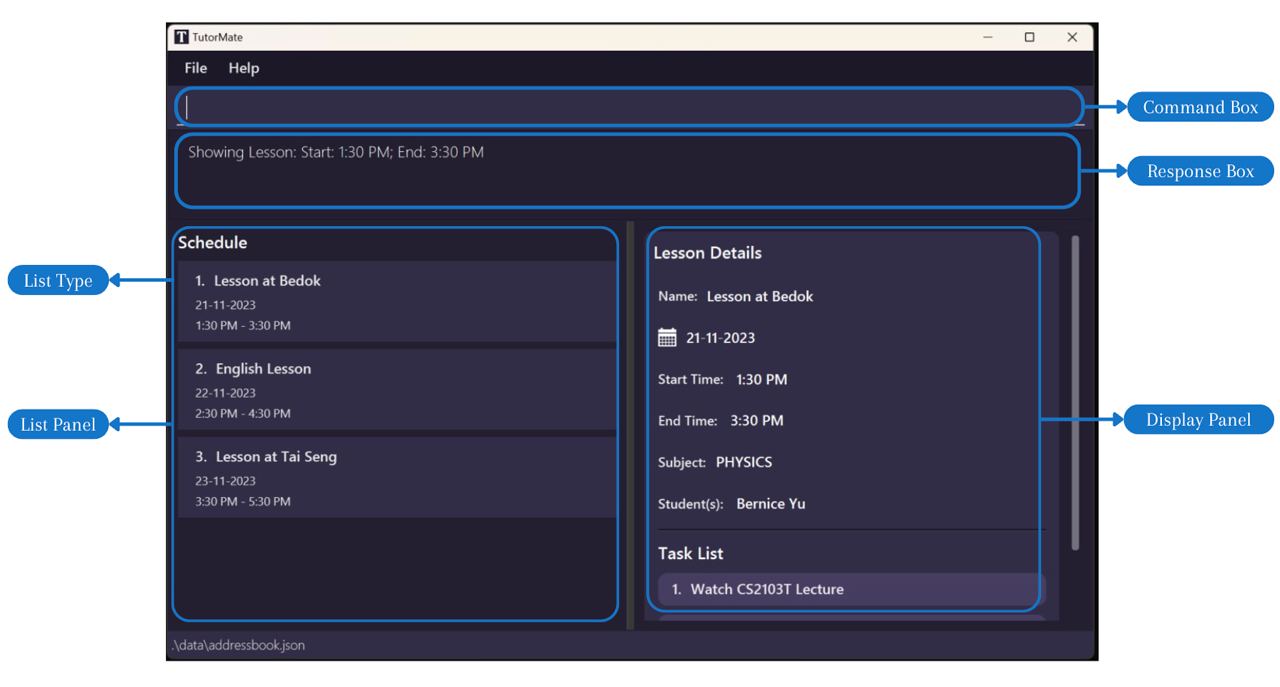
The GUI 1 has several main components (see GUI 2 image below):
- The command box is for users to enter and execute commands.
- The response box is to display responses for command execution, to indicate success or errors.
- The left side has the list panel, which shows different list types (student, schedule, tasks).
- The right side has the details panel, which shows details of any specific item in the list.
Viewing STUDENTS list, SCHEDULE list and TASKS list
In STUDENTS list:
Test case:
list students
Expected: A list of all students with their names is displayed in the list panel. Showing list students is shown in the response box.Test case:
list students email
Expected: A list of all students with their names and emails is displayed in the list panel.
In SCHEDULE list:
Test case:
list
Expected: A list of all lessons with their names, date, start and end time is displayed in the list panel. Showing list schedule is shown in the response box.Test case:
list schedule
Expected: A list of all lessons with their names, date, start and end time is displayed in the list panel. Showing list schedule is shown in the response box.
In TASKS list:
- Test case:
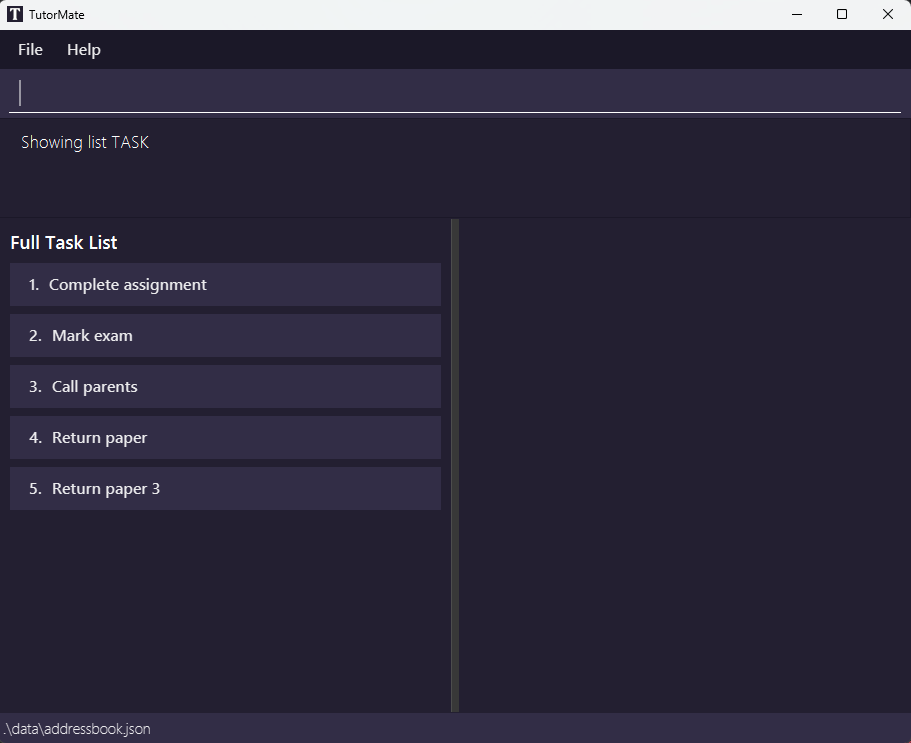
list tasks
Expected: The full task list with task description is displayed in the list panel. Showing list tasks is shown in the response box.
- Test case:
Show Feature
Showing a student in STUDENTS list
Prerequisites: List all students using the
list studentscommand. There are more than 2 and less than 80 students in the displayed list of students.Test case:
show 1
Expected: The first student in the displayed list of students is shown in the details panel. The details of the first student in the displayed list is shown in the response box.Test case:
show 80
Expected: Details panel remains the same. Error indicating index is invalid is shown in the response box.
Showing a lesson in SCHEDULE list
Prerequisites: List all lessons using the
listcommand. There are more than 2 and less than 80 lessons in the displayed list of lessons.Test case:
show 2
Expected: The second lesson in the displayed list of lessons is shown in the details panel. The details of the second lesson in the displayed list is shown in the response box.Test case:
show1
Expected: Details panel remains the same. Error indicating unknown command is shown in the response box.
Showing a task in TASK list
Prerequisites: List all tasks using the
list taskscommand. There are more than 2 and less than 80 tasks in the displayed list of tasks.Test case:
show 2
Expected: The second task in the displayed list of tasks is shown in the details panel. The details of the second task in the displayed list is shown in the response box.Test case:
show -2
Expected: Details panel remains the same. Error indicating invalid command format with the usage message of show is shown in the response box.
Add Feature
Adding a student in STUDENTS list
Prerequisites: List all students using the
list studentscommand. There is currently no student with the name "Leah", "Riley" and "Max".Test case:
addPerson -name Leah -phone 88888888 -subject biology -remark new student -tag new
Expected: A new student is added, with name "Leah", phone "88888888", subject "BIOLOGY", remark "new student" and tag "new". The details of the added student is shown in the response box.Test case:
add -name Riley -phone 81818181(in STUDENTS list)
Expected: A new student is added, with name "Riley" and phone "81818181". The details of the added student is shown in the response box.Test case:
addPerson -name Lea_h -phone 88888888 -subject biology -remark new student -tag new
Expected: No student is added. Error indicating invalid format with the name constraints shown in the response box.Test case:
addPerson -name Max -phone abcdefg
Expected: No student is added. Error indicating invalid format with the phone number constraints shown in the response box.Test case:
addPerson
Expected: No student is added. Error indicating invalid format and flag name not found shown in the response box.
Adding a lesson in SCHEDULE list
Prerequisites:
- List all lessons using the
listcommand. - There is currently no lessons with the name "Chemistry Lesson at Bedok" and "Biology Lesson at Tai Seng".
- There are no existing lessons from 12 December 2023 to 15 December 2023 in the application.
- There is an existing lesson on 11 December 2023 from 11:00 AM to 1:00 PM.
- List all lessons using the
Test case:
addLesson -name Chemistry Lesson at Bedok -day 2023/12/12 -subject chemistry -start 11:00 -end 13:30
Expected: A new lesson is added, with name "Chemistry Lesson at Bedok" from 11:00 AM to 1:30 PM on "2023/12/12" with subject "CHEMISTRY". The details of the added lesson is shown in the response box.Test case:
addLesson -name Biology Lesson at Tai Seng -day 2023/12/13 -start 15:00 -end 14:00
Expected: No lesson is added. Error indicating invalid lesson format and that the end time cannot be before start time is shown in the response box.Test case:
addLesson -name Biology Lesson at Tai Seng -day 2023/12/11 -start 12:00 -end 14:00
Expected: No lesson is added. Error indicating existing lesson clashes with lesson to be added with the details of the existing lesson in the schedule shown in the response box.Test case:
add -name Biology Lesson at Tai Seng(in SCHEDULE list)
Expected: A new lesson is added, with name "Biology Lesson at Tai Seng". The details of the added lesson is shown in the response box.
Adding a task to a lesson in SCHEDULE list
Prerequisites:
- List all lessons using the
listcommand. - There is currently no tasks with the name "Mark Alkanes Practice" and "Make Forces Notes" in all the lessons in the application.
- There is a task with the description "Mark Practice Paper" in all the lessons in the application.
- There are more than 2 and less than 80 lessons in the displayed list of lessons.
- List all lessons using the
Test case:
addTask 2 Mark Alkanes Practice
Expected: A new task is added to the second lesson in the displayed list of lessons, with description "Mark Alkanes Practice". The details of the added task is shown in the response box.Test case:
addTask Make Forces Notes(no lesson is shown in details panel)
Expected: No task is added to any of the lessons in the list. Error indicating no lesson is displayed and use show lessonIndex before adding task is shown in the response box.Test case:
show 1followed byaddTask Make Forces Notes
Expected: A new task is added to the first lesson in the displayed list of lessons, with description "Make Forces Notes". The details of the added task is shown in the response box.Test case:
addTask 1 Mark Practice Paper
Expected: No task is added to the first lesson in the displayed list of lessons. Error indicating existing task with same description in the specified lesson shown in the response box.Test case:
addTask
Expected: No task is added to any of the lessons in the list. Error indicating invalid description shown in the response box.
Delete Feature
Deleting a student in STUDENTS list
Prerequisites: There are more than 2 students in the displayed list of students.
Test case:
deletePerson 1
Expected: First student is deleted from the list. Details of the deleted student is shown in the response box.Test case:
delete 1(in STUDENTS list)
Expected: First student is deleted from the list. Details of the deleted student is shown in the response box.Test case:
deletePerson 0
Expected: No student is deleted. Error indicating index input cannot be zero is shown in the response box.Test case:
deletePerson -1
Expected: No student is deleted. Error indicating index input cannot be negative is shown in the response box.Test case:
deletePerson
Expected: No student is deleted. Error indicating invalid command format is shown in the response box.
Deleting a lesson in SCHEDULE list
Prerequisites: List all lessons using the
listcommand. There are more than 2 and less than 80 students in the displayed list of lessons.Test case:
deleteLesson 1
Expected: First lesson is deleted from the list. Details of the deleted lesson is shown in the response box.Test case:
delete 3(in SCHEDULE list)
Expected: Third lesson is deleted from the list. Details of the deleted lesson is shown in the response box.Test case:
deleteLesson 80
Expected: No lesson is deleted. Error indicating index input is out of bounds and the acceptable range is shown in the response box.Test case:
deleteLesson
Expected: No lesson is deleted. Error indicating invalid command format is shown in the response box.
Deleting a task from a lesson in SCHEDULE list
Prerequisites:
- List all lessons using the
listcommand. There are more than 2 lessons in the displayed list of lessons. - All lessons have more than 2 and less than 10 tasks.
- List all lessons using the
Test case:
show 1followed bydeleteTask 2
Expected: The second task in the task list of the first lesson in the displayed list of lessons is deleted. Details of the deleted task is shown in the response box.Test case:
deleteTask 1
Expected: No task is deleted. Error indicating the use of show lesson before deleting task is shown in the response box.Test case:
deleteTask 1(in STUDENTS list) Expected: No task is deleted. Error indicating deleting of tasks only in schedule list is shown in the response box.Test case:
deleteTask 1(in TASKS list) Expected: No task is deleted. Error indicating deleting of tasks only in schedule list is shown in the response box.
Edit Feature
Editing a student in STUDENTS list
Prerequisites:
- List all students using the
list studentscommand. - There is currently no student with the name "Leah" and "Max".
- There is an existing student with the name "Riley".
- There are more than 2 students in the displayed list of students.
- List all students using the
Test case:
editPerson 1 -name Leah
Expected: The name of the first student in the displayed list of students is edited to "Leah". Details of the edited student is shown in the response box.Test case:
edit 2 -name Max -subject biology(in STUDENTS list)
Expected: The name of the second student in the displayed list of students is edited to "Max" and the subject of this student is set to "BIOLOGY". Details of the edited student is shown in the response box.Test case:
editPerson 1 -name Riley
Expected: No student is edited. Error indicating a clash detected is shown in the response box.
Editing a lesson in SCHEDULE list
Prerequisites:
- List all lessons using the
listcommand. - There is currently no lessons with the name "Chemistry Lesson at Bedok", "Biology Lesson at Tai Seng" and "Lesson".
- There is an existing lesson on 2023/12/12 from 13:00 to 15:00.
- There are more than 2 lessons in the displayed list of lessons.
- List all lessons using the
Test case:
editLesson 1 -name Chemistry Lesson at Bedok
Expected: The name of the first lesson in the displayed list of lessons is edited to "Chemistry Lesson at Bedok". Details of the edited lesson is shown in the response box.Test case:
edit 2 -name Biology Lesson at Tai Seng -start 10:00 -end 12:00(in SCHEDULE list)
Expected: The name and time of the second lesson in the displayed list of lessons is edited to "Biology Lesson at Tai Seng" and "10:00AM" to "12:00PM" respectively. Details of the edited lesson is shown in the response box.Test case:
editLesson 1 -name Lesson -start 12:00 -end 14:00 -day 2023/12/12
Expected: No lesson is edited. Error indicating a clash detected is shown in the response box.
Find Feature
Finding a student by name in STUDENTS list
Prerequisites:
- List all students using the
list studentscommand. - There are currently four students with names "Alex Wong", "Alex Yeoh", "Willy Wonka" and "Wong Max".
- List all students using the
Test case:
find Alex
Expected: Only students with the name "Alex Wong" and "Alex Yeoh" are shown in the list panel. A message indicating the number of students listed is shown in the response box.Test case:
find alex
Expected: Only students with the name "Alex Wong" and "Alex Yeoh" are shown in the list panel. A message indicating the number of students listed is shown in the response box.Test case:
find won
Expected: Only students with the name "Alex Wong", "Willy Wonka" and "Wong Max" are shown in the list panel. A message indicating the number of students listed is shown in the response box.Test case:
find xyz
Expected: No students are shown. A message indicating 0 persons listed is shown in the response box.
Finding a lesson by name in SCHEDULE list
Prerequisites:
- List all lessons using the
listcommand. - There are currently three lessons with names "Chemistry Lesson at bedok", "lesson chem at kovan" and "bedok eng".
- List all lessons using the
Test case:
find chem
Expected: Only lessons with the name "Chemistry Lesson at bedok" and "lesson chem at kovan" are shown in the list panel. A message indicating the number of lessons listed is shown in the response box.Test case:
find bedok
Expected: Only students with the name "Chemistry Lesson at bedok" and "bedok eng" are shown in the list panel. A message indicating the number of lessons listed is shown in the response box.Test case:
find
Expected: List panel remains the same. Error indicating invalid command format is shown in the response box.
Filter Feature
Filtering a student in STUDENTS list
Prerequisites:
- List all students using the
list studentscommand. - There are currently four students with "ENGLISH" as subjects.
- There are currently three students with "new" tag.
- There are currently two students with "yet to pay" remark.
- List all students using the
Test case:
filter -subject english
Expected: Four students are shown in the list panel. A message indicating filtered student list successfully is shown in the response box.Test case:
filter -tag new
Expected: Three students are shown in the list panel. A message indicating filtered student list successfully is shown in the response box.Test case:
filter -remark yet to pay
Expected: Two students are shown in the list panel. A message indicating filtered student list successfully is shown in the response box.Test case:
filter -subject bio
Expected: List panel remains the same. Error indicating invalid filter format and subject constraints is shown in the response box.
Filtering a lesson in SCHEDULE list
Prerequisites:
- List all lessons using the
listcommand. - There are currently four lessons with "PHYSICS" as subjects.
- There are currently two lessons on 12/12/2023, one lesson on 13/12/2023, three lessons on 14/12/2023.
- There are currently two lessons with no date specified.
- List all lessons using the
Test case:
filter -subject physics
Expected: Four lessons are shown in the list panel. A message indicating filtered schedule list successfully is shown in the response box.Test case:
filter -on 2023/12/12
Expected: Two lessons are shown in the list panel. A message indicating filtered schedule list successfully is shown in the response box.Test case:
filter -after 2023/12/13
Expected: Five lessons are shown in the list panel (three lessons on 14/12/2023 & two lessons with no date specified). A message indicating filtered schedule list successfully is shown in the response box.Test case:
filter -before 2023/10/10
Expected: No lessons are shown in the list panel. A message indicating filtered schedule list successfully is shown in the response box.
Link Feature
Linking a lesson to a student in STUDENTS list
Prerequisites:
- List all students using the
list studentscommand. - The first student in the list has the name "Alex Yeoh" with one lesson named "Bedok Lesson" linked to him.
- There are currently three lessons with names "Chemistry Lesson at Bedok", "Biology Lesson at Bedok" and "Bedok Lesson".
- List all students using the
Test case:
show 1followed bylinkTo Chemistry Lesson at Bedok
Expected: Lesson with the name "Chemistry Lesson at Bedok" is linked to the currently shown student ("Alex Yeoh") in the details panel. A message indicating student linked to lesson is shown in the response box.Test case:
link -student alex yeoh -lesson biology lesson at bedok
Expected: Student "Alex Yeoh" is linked to the lesson with the name "Biology Lesson at Bedok". A message indicating student linked to lesson is shown in the response box.Test case:
show 1followed bylinkTo bedok
Expected: No lesson is added to the currently shown student in the details panel. Error indicating no such lesson is shown in the response box.Test case:
show 1followed bylinkTo
Expected: No lesson is added to any student. Error indicating name should be alphanumeric andlinkTocommand usage is shown in the response box.
Linking a student to a lesson in SCHEDULE list
Prerequisites:
- List all lessons using the
listcommand. - The first lesson in the list has the name "Bedok Lesson" with one student named "Alex Wong" linked to it.
- There are currently four students with names "Alex Wong", "Alex Yeoh", "Willy Wonka" and "Willy Max".
- Only "Alex Wong" has a lesson linked to him. All other students have no lessons linked to them.
- List all lessons using the
Test case:
show 1followed bylinkTo Alex Yeoh
Expected: Student "Alex Yeoh" is linked to the currently shown lesson in the details panel. A message indicating student linked to lesson is shown in the response box.Test case:
link -student willy max -lesson bedok lesson
Expected: Student "Willy Max" is linked to the lesson with the name "Bedok Lesson". A message indicating student linked to lesson is shown in the response box.Test case:
show 1followed bylinkTo willy
Expected: No student is added to the currently shown lesson in the details panel. Error indicating no student with name "willy" found is shown in the response box.Test case:
show 1followed bylinkTo alex wong
Expected: No student is added to the currently shown lesson in the details panel. A message indicating student is already linked to lesson is shown in the response box.
Navigate Feature
Navigating to lessons linked to a student in STUDENTS list
Prerequisites:
- List all students using the
list studentscommand. - The first student in the list is named "Alex Yeoh" with three lessons linked to him.
- The second student in the list is named "Willy Wonka" with no lessons linked to him.
- List all students using the
Test case:
show 1followed bynav
Expected: Three lessons are shown in the list panel. A message indicating navigated to student's lesson is shown in the response box.Test case:
show 2followed bynav
Expected: List panel remains the same. Error indicating no lessons linked to student is shown in the response box.
Navigating to students linked to a lesson in SCHEDULE list
Prerequisites:
- List all lessons using the
listcommand. - The first lesson in the list is named "Lesson at Bedok" with two students linked to it.
- The second lesson in the list is named "Lesson at Punggol" with no student linked to it.
- List all lessons using the
Test case:
show 1followed bynav
Expected: Two students are shown in the list panel. A message indicating navigated to lesson's students is shown in the response box.Test case:
show 2followed bynav
Expected: List panel remains the same. Error indicating the lesson has no linked students is shown in the response box.
Command History Feature
Prerequisites:
- Re-launch the application.
list students,list schedule,list taskswere entered in this order into the command box.
Test case: (Steps 1 to 5 below are performed sequentially.)
- Step 1. Press the arrow up button on keyboard.
Expected:list tasksis shown in the command box. - Step 2. Press the arrow up button on keyboard again.
Expected:list scheduleis shown in the command box. - Step 3. Press the arrow up button on keyboard again.
Expected:list studentsis shown in the command box. - Step 4. Press the arrow up button on keyboard again.
Expected:list studentsremains in the command box. - Step 5. Press the arrow down button on keyboard.
Expected:list scheduleis shown in the command box.
- Step 1. Press the arrow up button on keyboard.
Clear
Prerequisites:
- There are more than 1 student, 1 lesson and 1 task in the application.
- There are more than 1 student, 1 lesson and 1 task in the application.
Test case:
clear
Expected: The list panel becomes empty. A message indicating student, schedule and task list is cleared is shown in the response box.
Exit
Prerequisites:
- Run the application.
- Run the application.
Test case:
exit
Expected: The application exits.
Saving data
Dealing with missing/corrupted data files
- If a missing file is detected, the system will automatically create the missing .json file and fill up with sample data loaded from
SampleDataUtil.javaafter user adds data into the application. - If a corrupted file is detected (i.e. missing any key properties), the system will delete the corrupted file, and replace it with a new empty file.
- If a missing file is detected, the system will automatically create the missing .json file and fill up with sample data loaded from
Test cases
- Prerequisites: There are newly added students, lessons and tasks in the application. There are linked lessons and students.
- Test case: Shut down the application and delete
addressbook.json,personLessonMap.jsonandschedulelist.jsonin the data folder. Expected: Upon the next application start and login, newaddressbook.json,personLessonMap.jsonandschedulelist.jsonfiles are created. - Test case: Close the application and edit
addressbook.jsonby changing the name of the first student to Leah_Loh. Expected: Upon the next application start and login, a newaddressbook.jsonfile is created and replaces theaddressbook.jsoncorrupted file. - Test case: Close the application and edit
schedulelist.jsonby deleting the start time of the first lesson. Expected: Upon the next application start and login, a newschedulelist.jsonfile is created and delete theaddressbook.jsoncorrupted file.
Appendix: Planned Enhancements
Deleting of tags
- Relevant feature: editing of students
editPerson - Current issues: Once a tag is added to a student, the
editPersoncommand prevents you from deleting the tag. This is because by specifying the flag-tag, the parameter provided as the tag must be a non-empty string. - Proposed new behaviour: The
-tagflag can be made to accept an empty string.- Input:
editPerson 1 -tag - Expected output: The person at index 1 should have no more tags set.
- Input:
Unlinking of students from lessons and vice versa
- Relevant feature: linking
linkTo,link - Current issues: Once a student has been linked to a lesson, there is no way to unlink them.
- Proposed new behaviour: A new
unlinkFromandunlinkcommand that mirrorslinkToandlink, which will unlink the specified lesson and student if it detects that they have already been linked.- Input:
linkTo Bernice Yu - Expected output: Bernice Yu is linked to the current lesson
- Input:
unlinkFrom Bernice Yu - Expected output: Bernice Yu is unlinked from the current lesson.
- Input:
Navigating from tasks to lesson
- Relevant feature: Task Lists
list tasks - Current issues: There's no way to see what lesson a task is under.
- Proposed new behaviour: The
navcommand should also work when viewing a task.- Input:
nav - Expected output: The screen changes to the lesson that the task is assigned to.
- Input: